Mushroom-Stuffed Pork Tenderloin

I have shared a recipe for pork tenderloin before, but I really like this cut so I decided to up my game a little and stuff it with caramelized mushrooms and onions. After all that butterflying and spreading eagle and stuffing and tying with string, it started to feel a little 50-shades-of-grey…for the pork, I mean. Get your mind out of the gutter! Anyway, the end result was super tasty, and of course, made great left overs.

Mushroom-Stuffed Pork Tenderloin

Ingredients

  • 1 1/2 pound package of Pork Tenderloin
  • Extra Virgin Olive Oil or Grapeseed Oil (*Don’t Be Cheap! Alert)
  • 1 cup Mushrooms, chopped
  • 1 large, Yellow Onion, chopped
  • 1/2 tsp dry Oregano
  • 1/2 tsp dry Rosemary
  • Salt and Pepper

Preparation

For the filling…

  • Heat 1 tbsp of olive oil in a medium pan. Add the chopped onion and sauté until translucent.
  • Add the mushrooms and sauté for about 3 minutes.
  • Remove from heat and stir in seasonings. Set aside.

Now,

  • Pre-heat the oven to 400 Degrees.
  • Trim any silver skin and excess fat from roast, wash it off thoroughly, and pat dry with a paper towel.
  • Rub the roast all over with the oil and place in a roasting pan.
  • Sprinkle the roast with salt and then freshly ground black pepper.
    Make sure you roll the roast around so it gets coated everywhere with the seasoning.
  • Butterfly the tenderloin by cutting it straight down the center to about 3/4 of the roast’s depth. Spread open and spoon the mushroom sauté into the middle.
  • Using butcher string, close the roast up and wrap the string around in about 1 inch intervals. Tie it off. This part is messy; don’t over think it. Just close the roast up and secure as best you can.
  • Roast in the oven for about 30 minutes. Now is a good time to make stuffing or whatever sides you’ll be serving.
  • After the timer goes off, grab your digital thermometer and check the temp in the thickest part of the roast. If it’s between 158 and 160 degrees, pull the roast out and cover it with foil. Let it rest for at least 10 minutes before slicing.

If you want gravy….

  • Grab a baster and suck out the drippings. Add a 1/4 cup of the drippings into a small sauce pot and turn the flame on low. Stir 1/4 cup of flour into a measuring cup filled with 2 cups of COLD water and mix well.
  • Now comes the tricky part. While stirring the drippings constantly, slowly add the flour/water mixture to the drippings. Keep stirring! Keep stirring and stirring until you start to see the gravy get thick and smooth. If it’s thin, don’t stress. The cold air will thicken it when you are done cooking.
  • Taste it. If it’s bland, add in more drippings a 1/4 cup at a time until you reach gravy nirvana. You can add in salt and pepper to season. You can add in a splash of white wine or sherry if its handy, or a dash of cayenne if you want a little zippy-do-dah thing happenin’.

It was funny because the high heat scalded my drippings as the roast cooked so I was freaking out about my gravy. I wanted to serve it sliced over french bread, open-faced sandwich style with stuffing on the side. I spent so much time making the roast that I ran out of energy and patience to make stuffing and now I would have no gravy?? I ended up doing some weird gravy hack using cream of chicken soup, just to have something to soak the bread. It turns out, we didn’t need gravy at all. The mushroom mixture was so delicious and savory and the roast turned out so perfectly tender, it didn’t need a date to this disco. Live and learn.

Nom on,

~Crunchy

Chili-Cheese Sauce

Generally speaking, I don’t have food addictions. I get on kicks where I will eat a lot of something for a few weeks and move on to my next fixation. Chili-cheese dip seems to be my one constant. I have been making it for so long I have it down to a fine science, and it. is. GOOD. So good I had a guest just take the whole pot off the stove at a party once and sit in a corner, hovering protectively while he shoveled chips heaped with it in his mouth. I think he was even making that weird, growling noise zombies do when they first get infected. Anyway, this dip will solve all your chili-cheese related cravings and situations. Just make sure you have Worcestershire sauce on hand to cure anyone that is starting to turn.

Chili Cheese Dog

Chili-Cheese Sauce

Ingredients:

  • 1 can Turkey Chili with Beans, your favorite brand.
  • 1 can Ro-Tel Chili Tomatoes – This is the point where you control the heat. There are mild, regular, and hot versions.
  • 1 cup freshly grated cheese – This is where you control the kick. Any cheese melts and you can make your dip smokey, creamy, mellow, or spicy. NO processed cheeses like velvetta and no skim-milk cheese. It has to be real cheese that you shred yourself. The better the quality, the better the dip.

Optional, cold add-ins

  • Chopped red or white onions
  • Cilantro
  • Green Onion
  • Sour Cream

Preparation:

  • In a small sauce pan, heat the chili over a medium-low flame.
  • Drain out all the liquid from the canned tomatoes, then stir into the chili.
  • Once the chili mixture starts simmering, give it about a minute and keep stirring. Turn off the heat completely.
  • Fold in your freshly grated cheese and stir until the cheese is totally melted and blended into the chili.
  • Fold in your cold toppings last, if you are using any.
    • Note: If this mixture is intended to smother, a hot dog or fries for example, add you cold toppings AFTER you smother.

Wait, that’s it? 

Yep! The trick is less about the ingredients than the process. You see, melted cheese is completely easy to screw up. It doesn’t microwave and you can’t ever let it come into contact with direct heat. If you have tried to make cheese dips or melted cheese in the past and the end result was an oily, scorched mess, that’s why. Folding the cheese into your already hot chili that is beginning to cool achieves the perfection you’d otherwise need a double broiler for.

I have my sauce, now what?

Well, it’s not rocket science, but there are a few things to keep in mind. First, you already have your cheese folded in so if you want to make chili dogs or hamburgers, DON’T add slices of cheese and then smoother. Secondly, as I mentioned before, save your cold toppings for last. Even if you want to serve this as a batch of smothered nachos, sprinkle your onions and sliced green onion around after you smother the tortilla chips. Only fold in the cold toppings if you intend to serve as a dip or eat straight out of a bowl as a chili.

I don’t like canned chili. Can I use my own?

Yeah, absolutely. But, don’t use a low-sodium, low-fat recipe. There is a time to cut calories and sodium, and chili-cheese day ain’t it. Simply put, the FAT and SALT are what make this dip addictive. If you don’t make your chili with enough of these things, the cheese is going to bland it out like there is no tomorrow and the chili-tomato mixture won’t save you. If you have a really solid chili and have crowd-tested it and been given the thumbs up, by all means, use it! But please add more salt than you would normally so it stands up to that full cup of cheese and extra chili and tomatoes.

Where’s the love for us vegetarians??

I do love you guys! I have a great chili for you right here! Fold in some cheese and ditch the pasta in this recipe if you are looking for a great veggie chili-cheese sauce. If you are vegan, just skip the cheese. Enjoy!

So, now you have no reason to stop at a fast food joint the next time you need to get your chili-cheese fix.

Nom on,

~Crunchy

3-Alarm Chili

I’m at yet another potluck, and someone is staring down at my chili with a confused look on their face.

“This looks like chili.”
“Yeah,” I say, “it is chili.”
“uh….with pasta? How does that work?”
“It just does,” I assure them. 

I found the base recipe years ago in a Betty Crocker vegetarian cookbook and have been hooked ever since. Once people get over their confusion and try it, I always get rave reviews—and you’ll love it too. The dish has a great spicy heat that you can dial up to suit your taste. The cinnamon in the sauce makes it especially comforting and aromatic in colder months. It’s chili-licious.
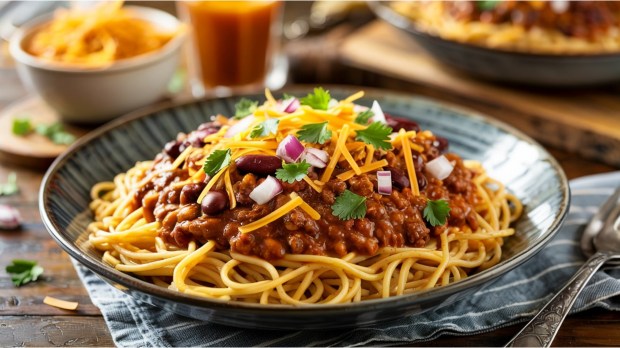
3-Alarm Chili

Special Equipment 

  • Dutch Oven

Ingredients

  • 1 tbsp Extra Virgin Olive Oil
  • 1 large white onion, chopped
  • 1 medium pepper (Heat Control: Green bell pepper for mild, Pasilla or Anaheim for medium, 2 large jalapeño peppers for hot, or 2 Serrano peppers for sadists.)
  • 3 cups water
  • 1/2 cup taco sauce (Heat Control: The hotter the taco sauce, the hotter the dish. Just be aware that this is the tomato-based taco sauce, NOT a pepper sauce like Tabasco.)
  • 2 cans diced tomatoes and chilis, undrained (Heat Control: Ro-Tel sells 4 versions of heat – Mild, Original, Hot, and Lime.)
  • 2 tsp chili powder
  • 1/2 tsp salt
  • 1/4 tsp pepper
  • 1/4 ground cinnamon
  • 1 can pinto beans, drained and rinsed
  • 1/4 box angel hair pasta

Optional Add-Ins:

  • Canned corn; adds a bright, sweet, crunchy contrast
  • Smoked Turkey Sausage; Adds fat, umami, savory notes, and checks the box if you prefer meat in your chili

Preparation:

  • In a dutch oven or a large, deep skillet, sauté the onions and bell pepper in EVOO until soft and translucent, about 4 minutes. 
  • Add in the water, cans of tomato and chiles, sauce and seasonings. Just hold off on the beans and angel hair pasta.
  • Bring to a boil and then reduce to medium-low heat. Simmer for 5 minutes.
  • Add in the beans and pasta and return to boiling. Reduce back to medium-high heat. Simmer for 8-10 minutes.
  • Serve with garnish assortment so people can doctor their chili up as desired.

Garnish Assortment

  • Sour cream
  • Cilantro, roughly chopped
  • Sliced, fresh jalapeño
  • Pepper sauces: Franks, Tabasco, Tapatillo, and Sriracha
  • Shredded cheese: Cheddar, Pepper Jack (for added heat), or Gouda—because this dish is already kinda whack, so why not add nuttiness?

Serving options

  • Summer version: Increase the heat and serve with tortilla chips, Frito scoops, and Tostito bowls. Pair with ice-cold light beer to balance the spice.
  • Fall comfort: Keep the heat mild and serve with skillet cornbread. There are many styles to explore—buttermilk, bacon, Southern, Northern.
  • Sweet-savory contrast: Make the chili moderately spicy. Prepare cornbread with honey and maple syrup instead of sugar. Serve on the side for dipping and scooping.

What’s a Trencher?

A trencher is a thick slice of bread placed in a bowl and drenched with chili or stew. You can eat it with utensils or go full medieval and use your hands.

What’s a Dutch Oven?

When I first started cooking, I didn’t know what this was. I asked around and got conflicting answers. Here’s the correct one: a Dutch oven is a deep pot with a tight-fitting lid. Mine has a lid that doubles as a skillet. It’s economical, durable, and built to last.

Nom on, 

~Crunchy

Turkey Spinach Meatballs

Meatballs are one of those versatile dishes that might seem mystifying or hard to make, but they don’t have to be. I will likely post more meatball recipes when we get back to the cooler, fall weather, but a turkey-spinach meatball has the right flavors for summer.

Spinach Turkey

Turkey Spinach Meatballs

Ingredients

  • 1 10-ounce package of frozen, chopped spinach, thawed and squeezed dry
  • 1 egg, beaten
  • 1 cup herbed or plain breadcrumbs
  • 2 tablespoons grated onion
  • 1 teaspoon garlic salt
  • 1 pound ground turkey

Preparation

  • Mix the spinach, egg, breadcrumbs, onion, and garlic salt together in a medium-sized bowl.
  • Add the ground turkey into the mixture and mix with your hands.
  • Pre-heat oven to 400 degrees and place a rack inside a shallow baking pan.
  • Shape your mixture into 2-inch balls and place on rack. You should end up with about 14-16 meatballs.
  • Bake, uncovered, for 20 minutes. The center should no longer be pink and you want the internal temp to be about 160 degrees.
  • Drain on paper towels.

Ok, I have meatballs. Now what do I do with them?

Well, to be fair, you can eat them on their own, with a nice cherry-tomato salad or fat slices of seasoned beef steak tomatoes. It’s low carb, super healthy, and perfect if its summertime and you want hearty without the heavy. But here are some other options. My personal creation, Farmer’s Market Soup, is at the very end and also a fabulous option if you want healthy and hearty. Highly recommended as an alternative to chicken noodle soup if you have a household suffering from flu and cold season and your need to nourish them back to life!

Capellini and Meatballs

  • Simmer them in 2 cups of your favorite marinara sauce until the sauce is thick and bubbly. Reduce the heat to low.
    (Tip: The sauce can wait, but the pasta can’t. Always make your sauce first and reduce heat all the way down to low.)
  • Bring water to bowl and add a teaspoon of extra virgin olive oil to the water, plus a little salt. Cook the pasta for 4-5 minutes and drain. Only do a very light rinse or you will lose all the oil.
  • Divide pasta and simmering meatballs into four bowls and serve with a little freshly grated parmesan cheese and crushed red pepper.

Meatball Subs

  • Simmer them in 2 cups of your favorite marinara sauce until the sauce is thick and bubbly. Reduce the heat to low.
  • Preheat oven to 400 degrees.
  • Cut open 4 sandwich rolls; crusty, french rolls from the bakery if you’ve got ’em.
  • Ladle meatballs and sauce into rolls. About 4 meatballs each.
  • Sprinkle with freshly grated parmesan cheese and crushed red peppers, then top with a slice provolone cheese.
  • Bake for 2-3 minutes at 400 degrees to melt the cheese and lightly toast the bread.

Swedish Meatballs

  • Prepare one package of egg noodles according to directions on package.
  • Combine 1 can condensed cream of mushroom soup, 1/4 cup milk, 1/2 cup sour cream, 1 tablespoon dried parsley, and 1/4 teaspoon ground nutmeg in medium sauce pan and stir.
  • Fold in meatballs and simmer for about 5 minutes, until sauce and meatballs are all heated through.
  • Pour over egg noodles, garnish with a little fresh parsley for color and serve with salt and pepper to taste. Red pepper flakes can also be offered if your brood likes their meals with a little kick.

Farmer’s Market Meatball Soup

  • In a large pot of dutch oven, add meatballs.Step One Meatballs
  • In a cast iron or stainless steel skillet, add a tablespoon of extra virgin olive oil and a BUNCH of fresh, chopped squash. There are so many types of squash in season during the summer and many farms just sell medley bags in their stalls with green, yellow, etc. Include one or two peeled and chopped carrots. Sauté for about 5 minutes, until a little tender. Don’t cook them all the way down as they need to survive the soup boiling process. Toss them in the pot with the meatballs.Step 2 Saute Squash
  • Next, in the same skillet, add more olive oil and pop in a head of roughly chopped spinach. If you can find a market stall that sells mixed bags of kale, spinach, and arugula (or other combo of dark, leafy greens) that is even better. Also add in a 1/2 basket of sliced white mushrooms. Sauté these gently, just until the leafy veggies wilt. Add them to the pot.Step 3 Saute Spinach
  • Take a moment to savor all that lovely color. Mmmm….Colorful Veggies
  • Next, add water to the pot, enough to just cover the top of all the veggies. I am guessing this is close to 8 cups. Bring to a boil.Step 4 Add Water
  • When the water is boiling, I add two large cubes of either chicken or vegetable bouillon to the water. This saves you the trouble of using broth (which spoils and is expensive) and adding a lot of salt.
  • Reduce heat and simmer for 10 minutes.
  • Now, here you have a choice. If you just want a light soup, you can simmer for another 10 minutes and be done with it. If you want a little more bulk to the soup you can return to a boil and either add 4 tablespoons of rice, lentils, couscous, or quinoa to your broth.
  • Simmer with the lid on for 10-15 minutes.
  • At this point I do a few rounds of taste testing. I try a spoonful and if its a little bland I add salt and black pepper, about 1/4 teaspoon at a time. I just keep stirring, tasting, and seasoning until I hit the ‘oooohhhh yeaaaah’ flavor. This is totally your call.

I serve this soup piping hot in a huge bowl with a hunk of lightly toasted french bread. I also put out crushed red peppers, Sriracha, salsa roja, pepper sauces like Franks or Tabasco, salt, pepper, sour cream, and grated parmesan cheese. It’s a fun soup to doctor up and I like to provide all the options.

Nom On,

~Crunchy

Buttermilk Baked Chicken

I’m a huge fan of fried chicken, but less excited about what the saturated grease does to my stomach. Enter this easy recipe that gives you utterly yummy, juicy chicken legs with 1/3 of the fat and none of the nasty. It does take about a day of advanced planning, but in general, it’s a very easy dish.

Buttermilk Baked Chicken

Buttermilk Baked Chicken

Ingredients

  • 9 or 10 chicken drumsticks
    • Budget Note: If you buy a big batch of drumsticks on sale and freeze them, you can defrost half the batch at the same time you marinate them.
  • 1 cup buttermilk
  • Pepper hot sauce – Tabasco, Franks, or Louisiana hot sauce all work
  • 1/2 teaspoon salt
  • 1/4 teaspoon pepper
  • 1 cup plain or Italian breadcrumbs

Preparation

  • In a small bowl, combine the buttermilk, a few dashes of hot sauce, and the salt and pepper together and stir.
  • Pour the mixture into a large freezer-sized ziplock bag. Add the chicken drumsticks, frozen or fresh, into the bag with the mixture. Move the chicken and mixture around to make sure it’s all coated and place in the fridge to marinate.
    • Fresh chicken – 3 hours
    • Frozen chicken – 24 hours.
  • Once your chicken is done marinating, pour the bread crumbs into a bowl or onto a plate. Roll each drumstick around to fully coat and place on a baking sheet coated in olive oil.
  • Bake at 400 degrees for 35 minutes.

Now you got yo’self a plate of chicken. Serve with whatever you normally like – baked beans, corn on the cob, potato salad, or mashed taters and gravy. No KFC shiz-nits for you!

Nom On,

~Crunchy

The Verde Burger

This weekend I went on a salsa-making rampage. This led to the need to use it and thus The Verde Burger was born. I call it The Verde because it is full of tasty green things – a thick turkey patty stuffed with avocado and diced jalapeño and drenched in freshly made salsa verde, which, of course, gets its color from the tomatillos and Serrano peppers used to make it. Add slices of Monterey jack cheese and juicy beefsteak tomato, and you got yourself a party.

The Verde Burger

Ingredients

For the patties

  • 1 pound ground turkey
  • 1 jalapeno, diced
  • 1 large, ripe avocado, cut into small chunks
  • 1 clove of garlic, chopped
  • 1/3 cup panko bread crumbs
  • 1/2 teaspoon salt
  • 1/4 teaspoon pepper

For the rest

  • 4 onion hamburger buns
  • 1 large beefsteak tomato, cut into 4 thick slices
  • 1/2 cup salsa verde, prepared in advance

Optional fixings

  • 4 leafs of romaine or other leafy, dark green lettuce
  • Thin slices of red onion
  • Roasted pasilla pepper fillets

Preparation

  • Heat up your grill – cast iron griddle, George Forman electric grill, or outdoor grills all work just fine.
  • Combine all the ingredients for the patties and form into 4, thick burgers.
  • Grill the burger patties.
  • Layer the bun with a slice of tomato, the patty, and smother in salsa. You can add your optional garnishes next, if using.

How do I get the perfect burger?

  • Flip the patties only once so each side gets browned.
  • DON’T PRESS on the patties or otherwise fiddle with them beyond the one flip. You will lose all the juices.
  • Don’t overcook. 155 – 160 degrees internal temp is enough. They will finish cooking as they rest.
  • Add your cheese slices right before you remove the patties from the grill. They will melt from the internal heat and not become rubbery or overly melted this way.

I dedicate this burger to Kermit the Frog. It’s not easy being green, but at least he’s got color- coordinated eats.

Nom On,

~Crunchy

The Perfect BLT: Bacon loves tomato

I don’t know what it is about a BLT that just screams perfection, but they can do. You see it on the menu or realize you have some tomato in your veggie drawer about to go to wasted veggie heaven so you think BLT…. and it’s super lackluster. The promise of simple greatness is there, your current sandwich stinks though. Like all simple dishes, it comes down to ingredients and prep. Let me show you the way; bacon loves tomato.

Perfect BLT

Ingredients

  • Onion Hamburger Buns or Onion Deli Rolls – the fatter and fluffier, the better
  • Thick cut Bacon – if a package has more than 9 slices, its false advertising
  • Ripe Beefsteak Tomatoes – squishy and ready to explode from the farmers market is best
  • Leafy Green Lettuce – Iceberg is watery and flavorless, so use it only if you can’t get romaine or any other dark green, leafy lettuce
  • Mayo or Miracle Whip
  • Salt and Pepper

Preparation

  • Either pan-fry or bake your bacon to about 155 – 160 degrees. Let rest.
    Note: Generally there are instructions on the package if you want to bake and I follow those, but reduce the time by a minute or two. You NEVER cook bacon to a full 165 degrees because it continues to cook through its internal heat and will ruin the flavor and texture. 
  • Slice your tomato to resemble a hamburger patty; thick and juicy. Dust each slice with salt and pepper. Tomato loves salt and soaks it up, so be liberal.
  • Rinse and tear your lettuce in large, ragged chunks.
  • Lightly toast the buns, face down to get a little texture to absorb the mayo.
  • Add mayo liberally to top and bottom bun. If it oozes out a little with each bite, that’s about right.
  • Layer bottom bun with lettuce, bacon, tomato, then top bun.

What stuff should I not add to my BLT?

  • cheese
  • avocado
  • mustard, ketchup, or hot sauce (ewww…)
  • fried egg or egg salad
  • tuna or chicken salad
  • deli meat

Look, I appreciate the desire to garnish. I have made my BLT with many of these things and realized I now have an egg  salad sandwich with bacon. Or a turkey club. If you start adding the stuff listed above, it’s not a BLT. You’ll be missing the point.

Serve with pickles and the usual picnic lunch sides. While chewing, raise hand in whatever hail Mary, peace and love, praise Jesus, party on, or namaste salute you feel is appropriate as your BLT craving is thus satisfied.

Nom On,

~Crunchy

Baked BBQ Chicken: Chicken-lickin’ good

I thought for my first post I would share a great recipe for baked ‘BBQ’ chicken. I found this simple approach to getting the sticky, gooey mess I love about BBQ food without the fuss of a grill. I hope you enjoy it!

Baked BBQ Chicken Drumsticks

Ingredients

  • Chicken Legs or Thighs (the bone-in, dark meat is juicer than boneless chicken breast.)
  • Olive Oil
  • Salt and Pepper
  • Sweet Heat BBQ sauce 

Preparation

  • Pre-heat oven to 400 degrees
  • Lay out ckicken on a rimmed, foil covered baking sheet
    • Brush meat with olive oil all over
    • Sprinkle salt and pepper all over
    • Set timer and bake for 20 minutes
  • Pull Chicken from oven
    • Brush chicken all over with BBQ sauce and bake for 7 minutes
    • Repeat once more and check internal temperature. If you have reached 160 degrees, allow chicken to rest
    • If needed, brush chicken with sauce once more and bake for an additional 5-7 minutes
  • For the final round of baking, check the chicken’s temperature to be sure it hasn’t already passed 160°F. If your chicken often turns out dry or chewy, you’re overcooking it. Remember, meat continues to cook after it’s removed from the oven. That’s why recipes tell you to let it “rest”—the internal heat finishes the job.
    In our world of paranoia about bacteria and food poisoning, it’s tempting to overcook meat. But the truth is, overcooked meat tastes terrible. 165°F is all you need. Respect the internal temperature, and let the meat rest.

If you don’t feel like making a big meal, these are delightful to eat with a loaf of fresh bread.

Nom on,

~Crunchy