Buttermilk Baked Chicken

I’m a huge fan of fried chicken, but less excited about what the saturated grease does to my stomach. Enter this easy recipe that gives you utterly yummy, juicy chicken legs with 1/3 of the fat and none of the nasty. It does take about a day of advanced planning, but in general, it’s a very easy dish.

Buttermilk Baked Chicken

Buttermilk Baked Chicken

Ingredients

  • 9 or 10 chicken drumsticks
    • Budget Note: If you buy a big batch of drumsticks on sale and freeze them, you can defrost half the batch at the same time you marinate them.
  • 1 cup buttermilk
  • Pepper hot sauce – Tabasco, Franks, or Louisiana hot sauce all work
  • 1/2 teaspoon salt
  • 1/4 teaspoon pepper
  • 1 cup plain or Italian breadcrumbs

Preparation

  • In a small bowl, combine the buttermilk, a few dashes of hot sauce, and the salt and pepper together and stir.
  • Pour the mixture into a large freezer-sized ziplock bag. Add the chicken drumsticks, frozen or fresh, into the bag with the mixture. Move the chicken and mixture around to make sure it’s all coated and place in the fridge to marinate.
    • Fresh chicken – 3 hours
    • Frozen chicken – 24 hours.
  • Once your chicken is done marinating, pour the bread crumbs into a bowl or onto a plate. Roll each drumstick around to fully coat and place on a baking sheet coated in olive oil.
  • Bake at 400 degrees for 35 minutes.

Now you got yo’self a plate of chicken. Serve with whatever you normally like – baked beans, corn on the cob, potato salad, or mashed taters and gravy. No KFC shiz-nits for you!

Nom On,

~Crunchy

Carrot Cupcakes: Ohhhh yeah…..

Ah, carrot cake… Is there anything better? All you people with your red velvet and cheesecake obsessions need to take this dollar I’m holding down to the corner and buy yourself a clue. But then, if you make a cake you have this behemoth darkening your fridge. The solution? Well, it’s me so I think the solution is always found in a cupcake pan.

Carrot Cupcakes

Ingredients:

For the cupcakes….

  • 2/3 cup grapeseed oil
  • 1 1/2 cups grated carrots
  • 1 cup flour
  • 3/4 cup sugar
  • 1 teaspoon cinnamon
  • 1 teaspoon baking soda
  • 1/2 teaspoon baking powder
  • 1/4 teaspoon salt
  • 2 eggs, beaten

For the not-too-sweet frosting ….

  • 4 ounces cream cheese
  • 4 tablespoons butter
  • 2/3 cup powdered sugar
  • 1 teaspoon vanilla
  • Nutmeg

Preparation:

  • Wash and skin the carrots. Grab a cheese grater and put on a good audio book while you grate the carrots. If you have one of them fancy food processors, you can use that and save time. I like to save to save space, thus the audio book.
  • Pre-heat the oven to 350 degrees.
  • Once the carrots are grated, combine them in a small bowl with the oil.
  • In a large bowl, combine all the dry ingredients. Make sure you don’t add the eggs.
  • Now, with the dry ingredients mixed, fold in the carrot-oil mixture and take care not to mix it much. You want the batter folded, not mixed.
  • Beat the eggs separately and then fold those in, too. Stir the eggs into the batter just a little, 10-15 swipes of  your spatula.
  • Line a 12-cup muffin pan with cupcake liners and then, using an ice cream scoop, divide the batter evenly among the muffin cups.
  • Bake for 13 minutes or so. They should be spongy on top and a golden-brown color.
  • Once baked, allow the muffins to cool.
  • Mix your frosting ingredients in a medium-sized bowl and beat at medium speed with a hand-mixer, until light and smooth.
    Note: If you cream cheese is a sticky mess in your mixing blades, turn the speed up and rove around the edges of the bowl. The speed will free the mixture from your blades and get it nice and smooth.
  • Using a rubber spatula, transfer the frosting into a plastic sandwich bag and snip off one edge. Pipe the frosting onto the cupcakes and lightly dust with nutmeg.
  • Hand off the mixing blades to your clean up crew, as available.

Clean up crew

Serve at room temperature, or you can refrigerate them for a few minutes if you want the frosting to be a little firm.

Be prepared to make these often, as they are seriously delicious. I don’t have a big sweet tooth, and thus I modified the original recipe I found at Pinch of Yum to be a more balanced and mildly sweet cupcake. I finally had a proper dessert that kept me coming back for more. If you do like really sweet stuff, just up the powdered sugar in the frosting to 2 cups and call your dentist.

Nom on,

~Crunchy

The Verde Burger

This weekend I went on a salsa-making rampage. This led to the need to use it and thus The Verde Burger was born. I call it The Verde because it is full of tasty green things – a thick turkey patty stuffed with avocado and diced jalapeño and drenched in freshly made salsa verde, which, of course, gets its color from the tomatillos and Serrano peppers used to make it. Add slices of Monterey jack cheese and juicy beefsteak tomato, and you got yourself a party.

The Verde Burger

Ingredients

For the patties

  • 1 pound ground turkey
  • 1 jalapeno, diced
  • 1 large, ripe avocado, cut into small chunks
  • 1 clove of garlic, chopped
  • 1/3 cup panko bread crumbs
  • 1/2 teaspoon salt
  • 1/4 teaspoon pepper

For the rest

  • 4 onion hamburger buns
  • 1 large beefsteak tomato, cut into 4 thick slices
  • 1/2 cup salsa verde, prepared in advance

Optional fixings

  • 4 leafs of romaine or other leafy, dark green lettuce
  • Thin slices of red onion
  • Roasted pasilla pepper fillets

Preparation

  • Heat up your grill – cast iron griddle, George Forman electric grill, or outdoor grills all work just fine.
  • Combine all the ingredients for the patties and form into 4, thick burgers.
  • Grill the burger patties.
  • Layer the bun with a slice of tomato, the patty, and smother in salsa. You can add your optional garnishes next, if using.

How do I get the perfect burger?

  • Flip the patties only once so each side gets browned.
  • DON’T PRESS on the patties or otherwise fiddle with them beyond the one flip. You will lose all the juices.
  • Don’t overcook. 155 – 160 degrees internal temp is enough. They will finish cooking as they rest.
  • Add your cheese slices right before you remove the patties from the grill. They will melt from the internal heat and not become rubbery or overly melted this way.

I dedicate this burger to Kermit the Frog. It’s not easy being green, but at least he’s got color- coordinated eats.

Nom On,

~Crunchy

Chile Rellenos: Fried batter goodness

I think it’s safe to say that we all have our favorite dishes from any cuisine. And no matter how complicated and labor intensive it is to make it on our own, we anoint the dish worth the effort to learn. On this particular weekend, I decided that dish would be the Chili Relleno. After god knows how many hours, and god knows how many glasses of wine (I refuse to believe the wine delayed the process one bit,) the end result was stinging eyes, possibly a chili seed that got in my nose from itching it, a sense of pride, and a fully-bellied nap afterwards meant for the gods. It’s called, winning!!
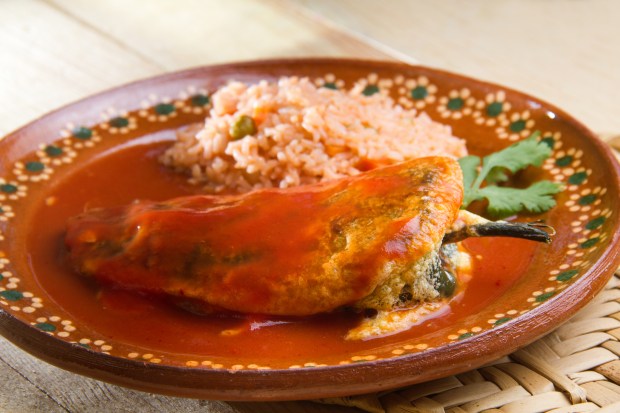
Chile Rellenos

Special Equipment

  • Cast Iron Skillet

Ingredients

  • 12 pasilla or Anaheim peppers
  • 1 pd block of jack or pepper jack cheese
    • *Note: If you have a smoked cheese, this is the time to use it. Some basic grocery stores sell habanero pepper jack and farmers markets often have cheese merchants that sell some amazing smoked cheeses.
  • Grapeseed Oil
  • 1 cup milk
  • 1 cup flour
  • 1 egg
  • 1 tsp baking powder
  • 1 tsp baking soda
  • 1 tsp salt

Preparation

  • Roast chili peppers

There are a few ways to do this. You can either brush the peppers with olive oil and roast them under the broiler, you can put them in a cast iron skillet or on a cast iron griddle, or you can put them right on the burner. The goal is to char the skins and get the peppers soft and flaccid. ( Heh, heh, she said ‘flaccid.’)

Roasted Peppers

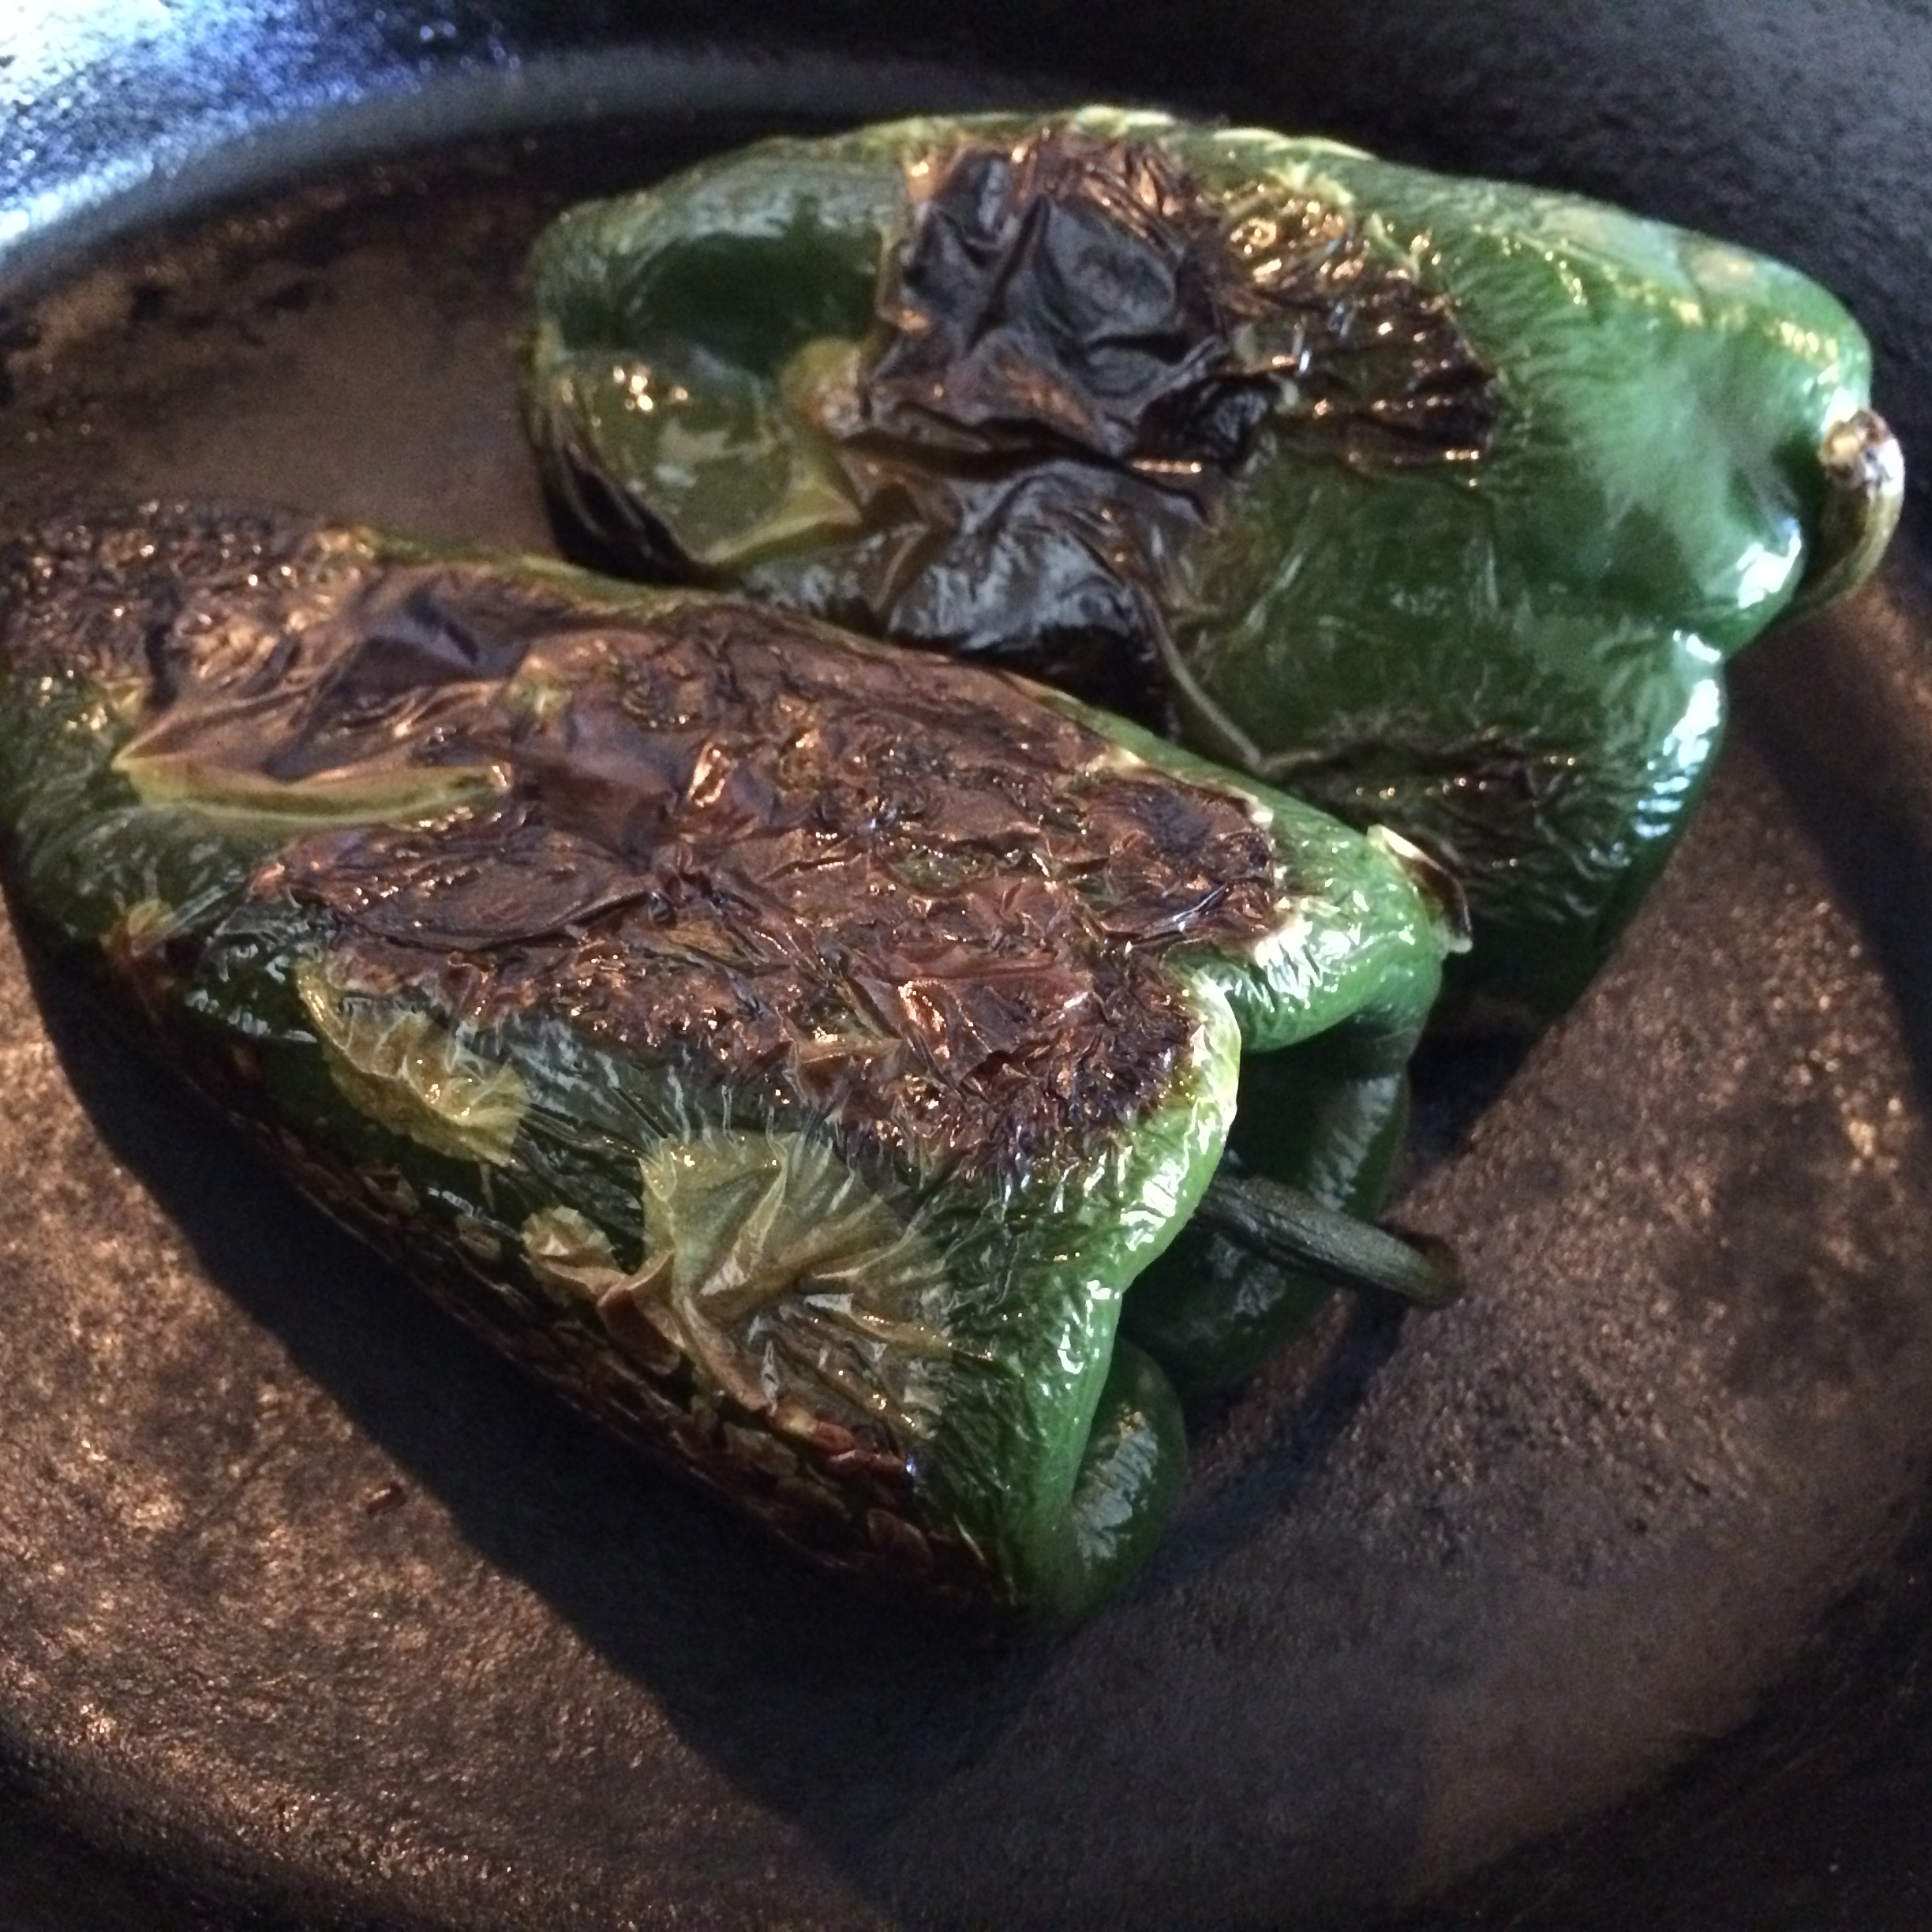
When the chiles are done roasting, put them in a plastic bag to steam for a few minutes. If you don’t have time to finish the project you can actually leave the peppers in the bag until you are ready to make your rellenos.

Steamed Chiles

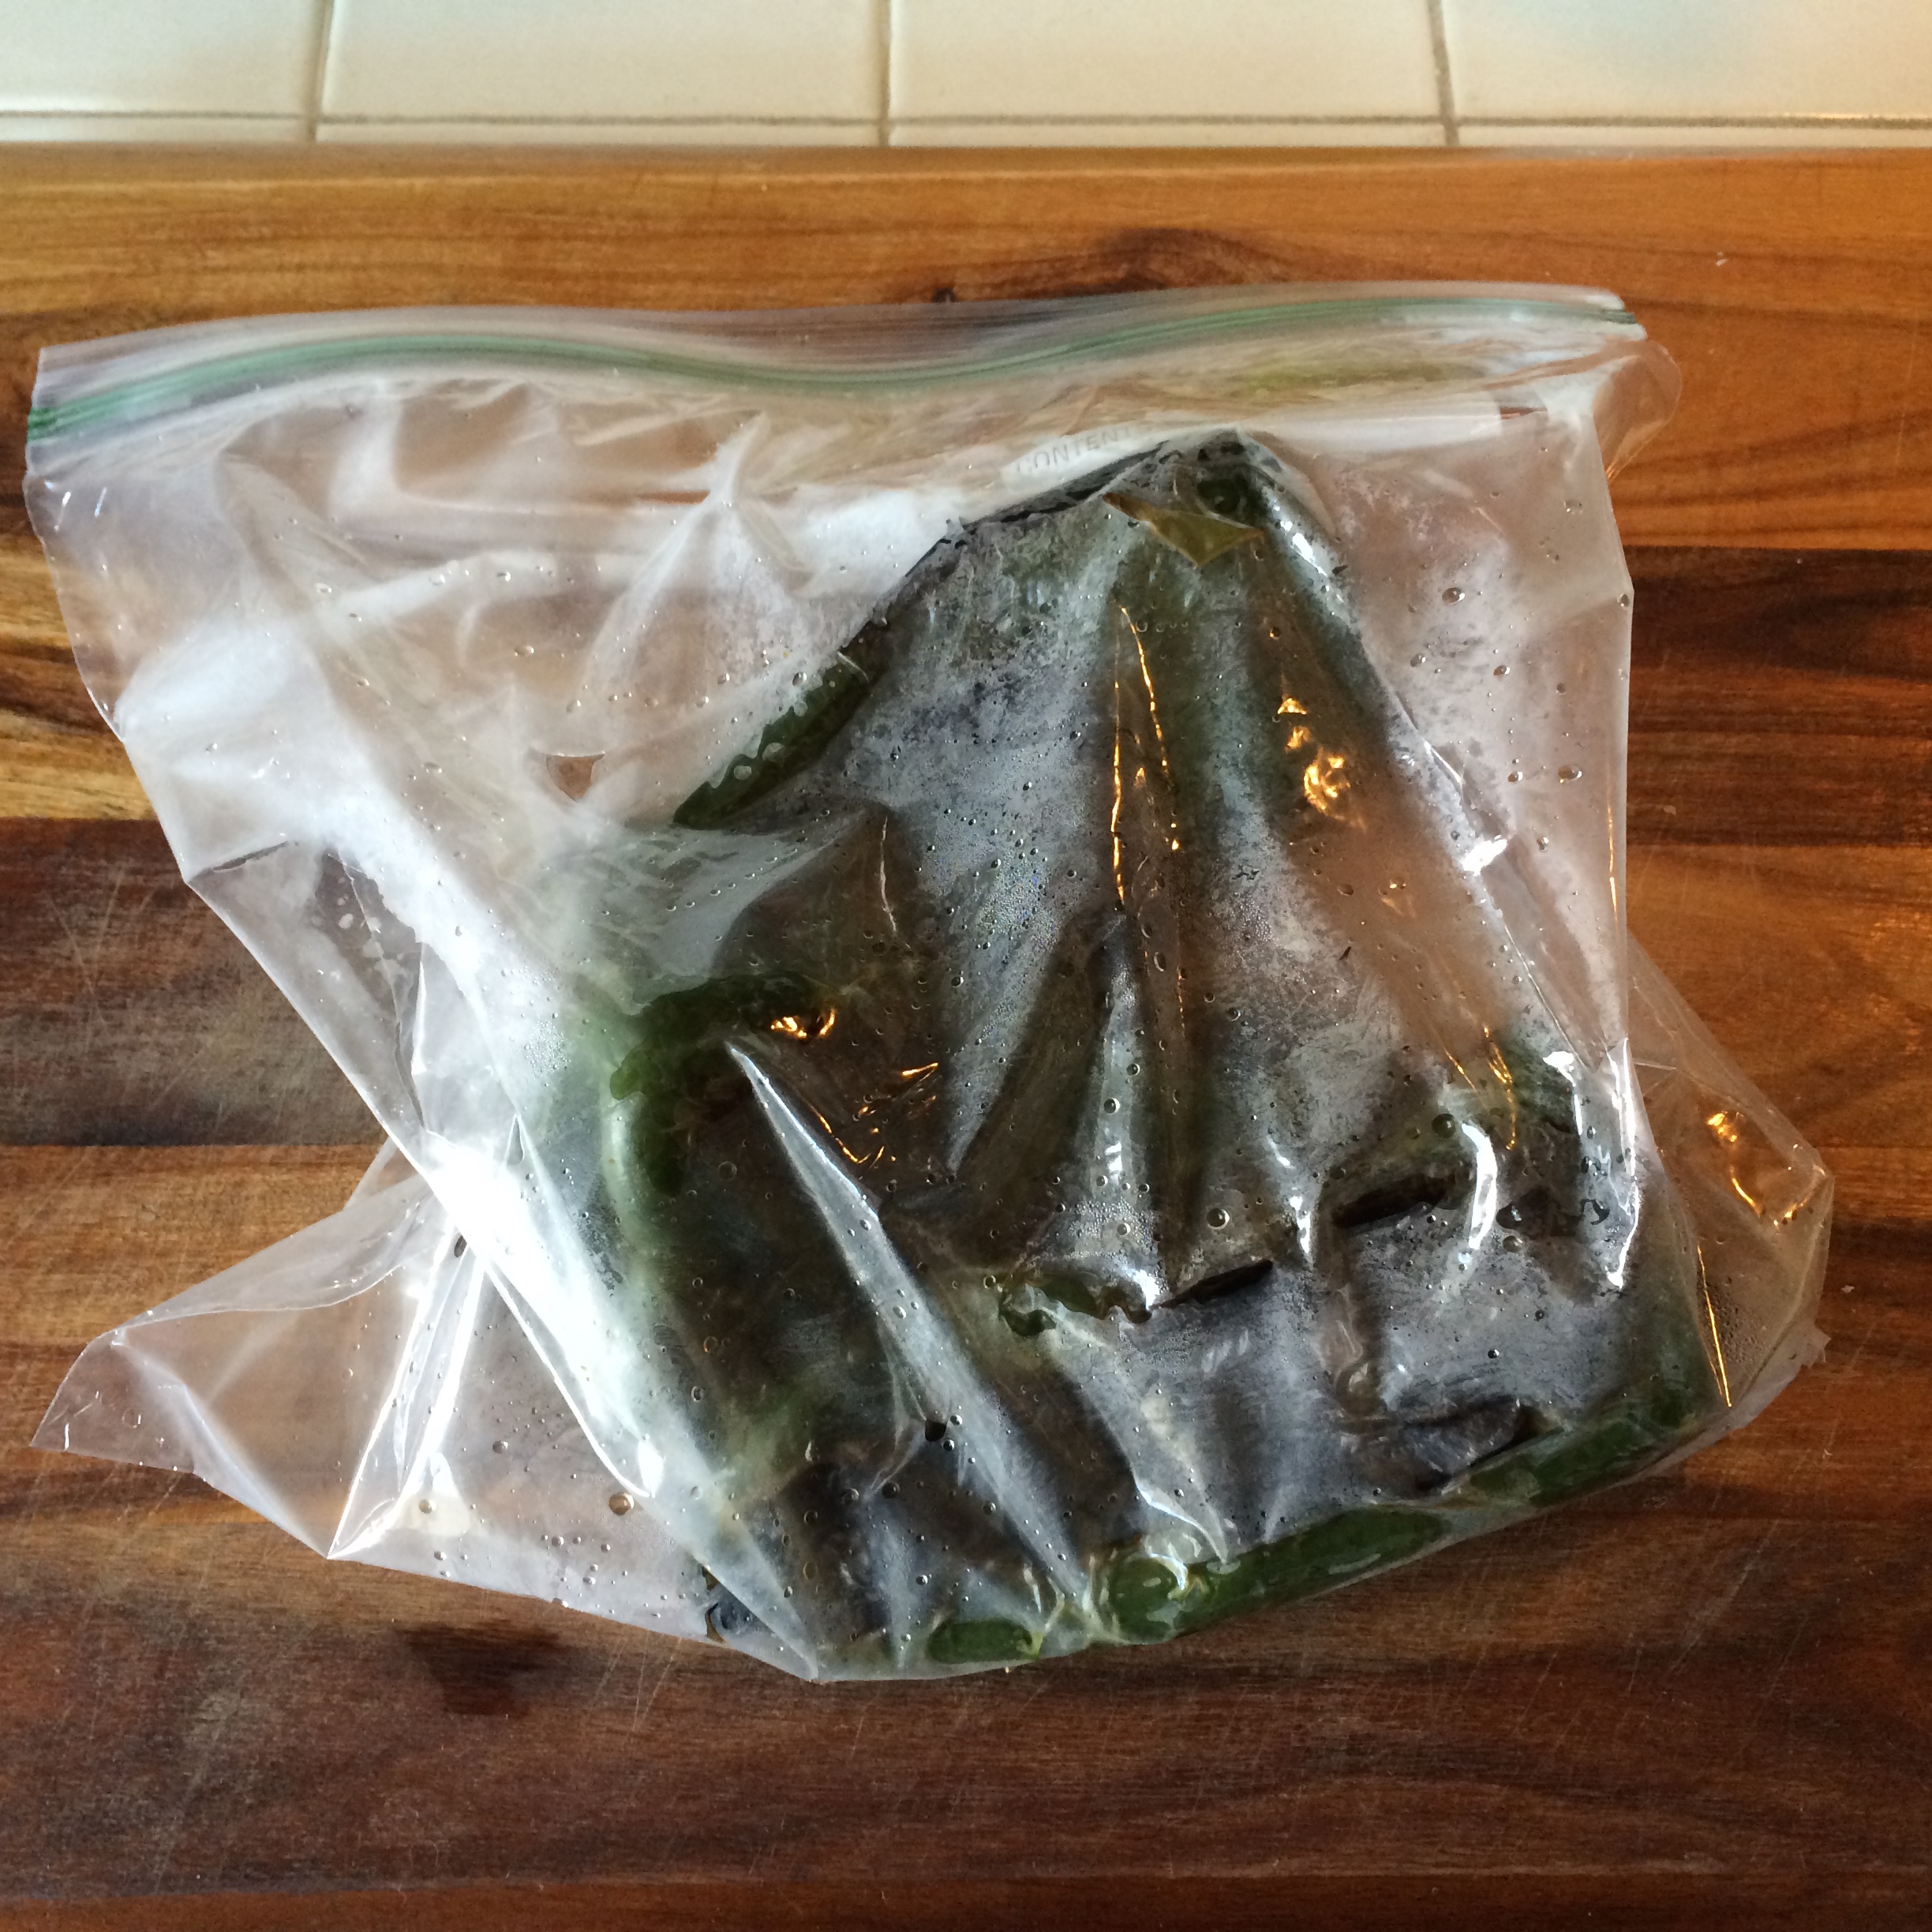
  • Slice a small opening into the chiles and scoop out the seeds. Using a paper towel and over the sink with the facet trickling, scrap the chard skins off the peppers.
  • Cut the 1 pound of cheese into 12 strips of equal size.
  • Stuff each pepper with a slice of cheese and close them up.
  • Mix the egg, flour, milk, baking soda and powder, salt and pepper and whisk with a fork. Sprinkle flour on your cutting board or prep surface.
  • Pour a fair amount of oil into your skillet, up to 1 inch and heat over a medium-high flame. (Personally, I don’t like cooking with that deep an oil bath because it splatters like crazy and is wasteful. I don’t cook with cheap oil, so I pour enough in to make about 1/4 inch bath and it browns the batter just fine.)
  • Now comes the tricky part. With your skillet oil slightly smoking, take a stuffed pepper and roll it in flour, than dip into the batter. Place the gooey, dripping mess into the oil and fry. Using tongs, each side only needs a minute or less, so roll as gently as you can to brown all sides of your relleno.
  • Once all the batter is fried, use tongs and transfer to a plate. Repeat that exact process with each of your peppers.
  • Once you have all your peppers fried, you may need to pop them in the microwave for just a few seconds to make sure that cheese is melted inside. This will depend on how thick the slices of cheese were that you stuffed the peppers with and how deep an oil bath you used.

How do I garnish and serve the rellenos?

Ok, this dish is popular all over central and south America and garnish styles do vary. If you are used to eating your rellenos served drenched in a mild ranchera sauce, you can certainly do that. I have had them that way, sometimes baked with a little cheese on top of the sauce. I have had rellenos served almost as a soup, the tomato sauce more a delicate broth than a sauce.  However, there are some communities that serve the dish plain and offer salsa roja or salsa verde and maybe a little sour cream to garnish as you see fit. I recommend you try it WITHOUT a sauce bath at least once because they are amaze-balls.

Try to eat your fill of rellenos BEFORE you look over at the disgusting, oil-splatter, batter-drip-covered nightmare your kitchen has become. It will bolster your spirits for the clean up job ahead. Or, if you have kids of chore-doing age, make those little punks deal with the mess while you take a nap and really give all that cheese and batter carte blanche access to your thighs.

Nom On,

~Crunchy

The Perfect BLT: Bacon loves tomato

I don’t know what it is about a BLT that just screams perfection, but they can do. You see it on the menu or realize you have some tomato in your veggie drawer about to go to wasted veggie heaven so you think BLT…. and it’s super lackluster. The promise of simple greatness is there, your current sandwich stinks though. Like all simple dishes, it comes down to ingredients and prep. Let me show you the way; bacon loves tomato.

Perfect BLT

Ingredients

  • Onion Hamburger Buns or Onion Deli Rolls – the fatter and fluffier, the better
  • Thick cut Bacon – if a package has more than 9 slices, its false advertising
  • Ripe Beefsteak Tomatoes – squishy and ready to explode from the farmers market is best
  • Leafy Green Lettuce – Iceberg is watery and flavorless, so use it only if you can’t get romaine or any other dark green, leafy lettuce
  • Mayo or Miracle Whip
  • Salt and Pepper

Preparation

  • Either pan-fry or bake your bacon to about 155 – 160 degrees. Let rest.
    Note: Generally there are instructions on the package if you want to bake and I follow those, but reduce the time by a minute or two. You NEVER cook bacon to a full 165 degrees because it continues to cook through its internal heat and will ruin the flavor and texture. 
  • Slice your tomato to resemble a hamburger patty; thick and juicy. Dust each slice with salt and pepper. Tomato loves salt and soaks it up, so be liberal.
  • Rinse and tear your lettuce in large, ragged chunks.
  • Lightly toast the buns, face down to get a little texture to absorb the mayo.
  • Add mayo liberally to top and bottom bun. If it oozes out a little with each bite, that’s about right.
  • Layer bottom bun with lettuce, bacon, tomato, then top bun.

What stuff should I not add to my BLT?

  • cheese
  • avocado
  • mustard, ketchup, or hot sauce (ewww…)
  • fried egg or egg salad
  • tuna or chicken salad
  • deli meat

Look, I appreciate the desire to garnish. I have made my BLT with many of these things and realized I now have an egg  salad sandwich with bacon. Or a turkey club. If you start adding the stuff listed above, it’s not a BLT. You’ll be missing the point.

Serve with pickles and the usual picnic lunch sides. While chewing, raise hand in whatever hail Mary, peace and love, praise Jesus, party on, or namaste salute you feel is appropriate as your BLT craving is thus satisfied.

Nom On,

~Crunchy

Cream cheese sopapilla: Cinnamon-sugar perfection

So I got all ambitious and bought LOADS of cream cheese a couple weeks ago thinking I’d attempt a cheesecake. And it sits there. And it sits there. And it sits there. I’m getting desperate. I need to use this stuff but I just don’t have time to make a cheesecake. Gak! After endless searching I stumble on this adorable little confection. It’s got sugar and spice and its handheld (a theme with me) and …. cream cheese! Yes. The process was still a bit time consuming, but man are these little suckers GOOD. I have had a hard time staying away from them they are so freaking good, and I don’t have a sweet tooth. No doubt they will tickle yours!

Cream Cheese Sopapillas

Ingredients

Filling

  • 1/2 pkg (4 oz) light cream cheese
  • 1/4 cup sugar
  • 1/2 tsp vanilla

Crust

  • 1 pkg refrigerated pie crusts
  • 2 tbsp butter, melted
  • 1/4 cup sugar
  • 1 tsp cinnamon
  • 2 inch round biscuit cutter, or small juice glass

Preparation

  • Set the cream cheese out to begin softening.
  • Sprinkle flour on your board or cutting surface. Roll out crusts and cut out as many 2 inch rounds as you can. I had to combine and re-roll a few times. You should get about 24 rounds. Pop them in the fridge to keep cool.
  • Once the rounds are done and the cheese has softened, combine the filling ingredients and blend with a hand blender until smooth and soft. Use a rubber spatula to transfer to a sandwich baggie. Set aside.
  • Pre-heat oven to 350.
  • Line two cookie sheets with parchment paper and lay out 12 crust rounds.
  • Snip the end off your filling baggie and pipe a small amount of filling onto each round.
  • Top the filling with the remaining 12 crust rounds. Using a fork, press along the edges of each pie to seal the crust layers together.
  • Bake at 350 degrees for 12-14 minutes.
  • In the meantime,
    • combine sugar and cinnamon in a shallow bowl. Set aside.
    • melt your butter in a bowl. Set aside.

When ready, let the pies cool just slightly.

  • Coat the tops of your pies.
  • Either dunk and cover your pies in the sugar mixture, or sprinkle over the tops. It just depends on how sweet you want them to be.

Depending on when you serve them, they go great with fresh berries and a vanilla latte. Or you can just guilty pluck one out of the fridge every time you go in the kitchen. I hear tell the calories don’t count if no one sees you eat it.

Nom On, 

~Crunchy

Shout out: Although my version tastes more like a mildly sweet tart, I did want to give credit to the clever baker who created this variation of the traditional sopapilla: http://www.crazyforcrust.com/2013/04/sopapilla-cheesecake-hand-pies/

Quesadilla Flight: The cure to the Saturday lunch doldrums

Oh lord, It’s Saturday afternoon again. The whole family is milling around, wanting lunch and a stack of sandwiches just sounds so….weekday sad. The errands are done and maybe you have a little more time to cook than usual. You look in the fridge and see a bunch of random, almost used up stuff like chicken breast, deli meat, and a couple hunks of cheese. I keep a stack of corn tortillas handy to handle Saturday afternoon, because nothing uses up leftovers and delights the palate like the quesadilla flight!

Quesadilla Flight

The Quesadilla Flight

Ingredients

  • Shredded Cheese – any kind, seriously. You can use cream cheese, too. I find jack or mozzerlla to be the most-kid friendly, so if you have that, use it.
  • Filling – empty your fridge of things like the tomato and avocado that are close to spoiling, the almost empty tub of deli meat, that lone left over chicken breast, the ubiqutous 1/2 onion … you get the idea. These all sound obvious but you can use up squash and that 1/4 jar of spaghetti sauce, too. Corn tortillas are one of the most versatile canvases ever, so don’t assume your flight has to only offer the more classic Mexican cuisine flavors.
  • Corn tortillas – they are healthier, tastier, and less caloric than flour. They are also smaller in size and maximize your number of canvases to make your combos. You’ll see.
  • Extra virgin olive oil

Preparation

  • Thinly slice veggies or finely dice whole pieces of meat such as chicken breast or pork tenderloin. Thinly sliced or finely diced ingredients cook better in quesadillas.
  • Shred your various cheeses and, depending on how compatible the flavors of the cheese, either keep them seperate or blend them. For examle, jack, cheddar, and mozzerella can be blended. Gouda usually can’t pair unless you have another nutty or smokey cheese like gruyere left over also. If you really want to up the diversity of your flights, don’t combine cheeses.
  • Let the crazy begin! I just go with flavors and pairings that I know to go well together based on what I have to work with. Cheddar, ham, and tomato slices. Pepper jack, turkey, and avocado slices. Cream cheese with tomato and olives. Jack with shredded chicken, diced onion, and cilantro. If I have nutty or smokey cheeses to use up, I add thin apple slices and some sauteed onions. Some cheeses pair well with pesto or berry jams, and of course if you have left overs from spaghetti night, just do a thin smear of tomato sauce, mozzarella, ham, and olives.
  • To cook the quesadillas, just put your pan over a medium-low flame and add a litte EVOO. Place the tortilla into the pan and rub around to coat. If using sauce, spreads or jams, spread that first. Then, sprinkle the cheese and then layer meat and then veggies. I let the cheese melt a little and then fold the tortilla over. You just want to cook each side to lightly brown and get the cheese gooey.
  • Repeat with various combos, based on your ingredients. I generally end up with quite a variety, even in I just omit an ingredient here or there or sub another. The goal is to make a flight, so they shouldn’t all taste just the same.
  • Serve with dips, lime or lemon wedges, or extra tomato slices dusted with salt and pepper. A little side salad if you have it handy.

Note: These guys get cold fast, so I am basically a short order cook. Serve as batches are ready and encourage your peeps to dig in. As Chef, you should be nomming as you cook. For this reason, I don’t make the same quesadilla twice in a row or your batches won’t be ‘flights.’

Dips to serve with my flights?

I am a dips, salsas, and sauces fanatic. As far as I am concerned, the food I eat is just a vehicle for the real flavor payload. So why not offer some with your quesadilla flight? Quick prep or left over salsa is obvious, but here are a few others I whip up.

Guac and Spiced Sour Cream

Crunchy’s Guacamole Dip

Ingredients

  • 2-3 Ripe avocados, cubed
  • 1 or 2 Roma tomatoes, chopped
  • 1/2 Red onion, coarsely chopped
  • 2 to 3 Garlic cloves, roughly diced
  • Fresh squeezed juice from 1 to 1 1/2 Limes
  • Salt and pepper, to taste
  • Ground cayenne, to taste
  • Cilantro, ripped or roughly chopped

Preparation

  • With a fork, mash and stir the avocado. You can leave it a little chunky; it’ll get smooth as you mix in your spices.
  • Fold in the tomato, onion, diced garlic and stir.
  • Squeeze in the lime juice and stir.
  • Add in about 1/4 tsp of salt and 1/8 tsp black pepper. Stir and taste.
  • Add in a few shakes of cayenne. Stir and taste.
  • If your quac seems bland, you can add in a little more salt or cayenne, but don’t go to crazy. Ground spices are more potent than freshly chopped peppers so the taste changes quickly.
  • Cover with plastic or seal with a lid if you prepped in tupperware. Refrigerate for 30 minutes or so. Perfect to prep this right before you start the quesadillas. Ground spices need way less time to soak and marinate than fresh ingredients.
  • When you serve, sprinkle a little cilantro on top. It’s more colorful and less overpowering this way than when you mix in with the other spices to marinate.

Crunchy’s Spiced Sour Cream Dip

  • When you are ready to serve the first batch of quesadillas, add a healthy dollop of sour cream to each plate. Dust each with black and/or cayenne pepper.
  • Dash some olive oil into your hot pan and pop a handful of diced onions in there. Stir and lightly sauté.
  • Add a tablespoon of the onions to each dollop of sour cream and serve.

I don’t know about you, but at this point, I am ready to … nom on,

~Crunchy

Baked BBQ Chicken: Chicken-lickin’ good

I thought for my first post I would share a great recipe for baked ‘BBQ’ chicken. I found this simple approach to getting the sticky, gooey mess I love about BBQ food without the fuss of a grill. I hope you enjoy it!

Baked BBQ Chicken Drumsticks

Ingredients

  • Chicken Legs or Thighs (the bone-in, dark meat is juicer than boneless chicken breast.)
  • Olive Oil
  • Salt and Pepper
  • Sweet Heat BBQ sauce 

Preparation

  • Pre-heat oven to 400 degrees
  • Lay out ckicken on a rimmed, foil covered baking sheet
    • Brush meat with olive oil all over
    • Sprinkle salt and pepper all over
    • Set timer and bake for 20 minutes
  • Pull Chicken from oven
    • Brush chicken all over with BBQ sauce and bake for 7 minutes
    • Repeat once more and check internal temperature. If you have reached 160 degrees, allow chicken to rest
    • If needed, brush chicken with sauce once more and bake for an additional 5-7 minutes
  • For the final round of baking, check the chicken’s temperature to be sure it hasn’t already passed 160°F. If your chicken often turns out dry or chewy, you’re overcooking it. Remember, meat continues to cook after it’s removed from the oven. That’s why recipes tell you to let it “rest”—the internal heat finishes the job.
    In our world of paranoia about bacteria and food poisoning, it’s tempting to overcook meat. But the truth is, overcooked meat tastes terrible. 165°F is all you need. Respect the internal temperature, and let the meat rest.

If you don’t feel like making a big meal, these are delightful to eat with a loaf of fresh bread.

Nom on,

~Crunchy