The Angeleno: Sprawl, Pulse, Juxtaposition

You know what Los Angeles and New York City have in common? You have to live there to get it. And in my case, ‘there’ is Southern California. Born, raised, never leaving. I don’t care how high the taxes get. Every once in a while, someone will say something to me, some out-of-state soul that’s from … not here, like, ‘California cuisine just means you guys add avocado to everything, right?’ This question betrays such a jaw-dropping level of cluelessness that I really think the creators of Baywatch owe every Southern Californian restitution for the reputation we now have to live with.

So, let me pull you in closer – so I can scream in your ear – ‘Southern California is fusion!’

Bright, alive, cars flowing through the arteries of Greater Los Angeles. Connecting people from all over the globe to the urban pulse; food trucks lined up and down the streets of DTLA, LBC, Inglewood, Koreatown, Hollywood, Pasadena, Glendale, and Santa Monica on a Saturday night, feeding us because you know we’re drunk and need something to soak up that booze, mamacita! Hell, yeah, I want extra kimchi on my pork belly tacos to go with my elote that I got from that other truck! Or, summoning talent from the world’s culinary capitals to spin up inspired dining scapes surrounded by the choreography of the Theater District or the curated calm of Beverly Hills.

But I get it, you are reading this from … not here. And that’s ok. You just make this little pie of mine, throw on a movie that pulls you deep into our vibe – Drive, Heat, LA Confidential, or Mulholland Drive – and taste the juxtaposition. And guess what? There ain’t one damn slice of avocado on it.
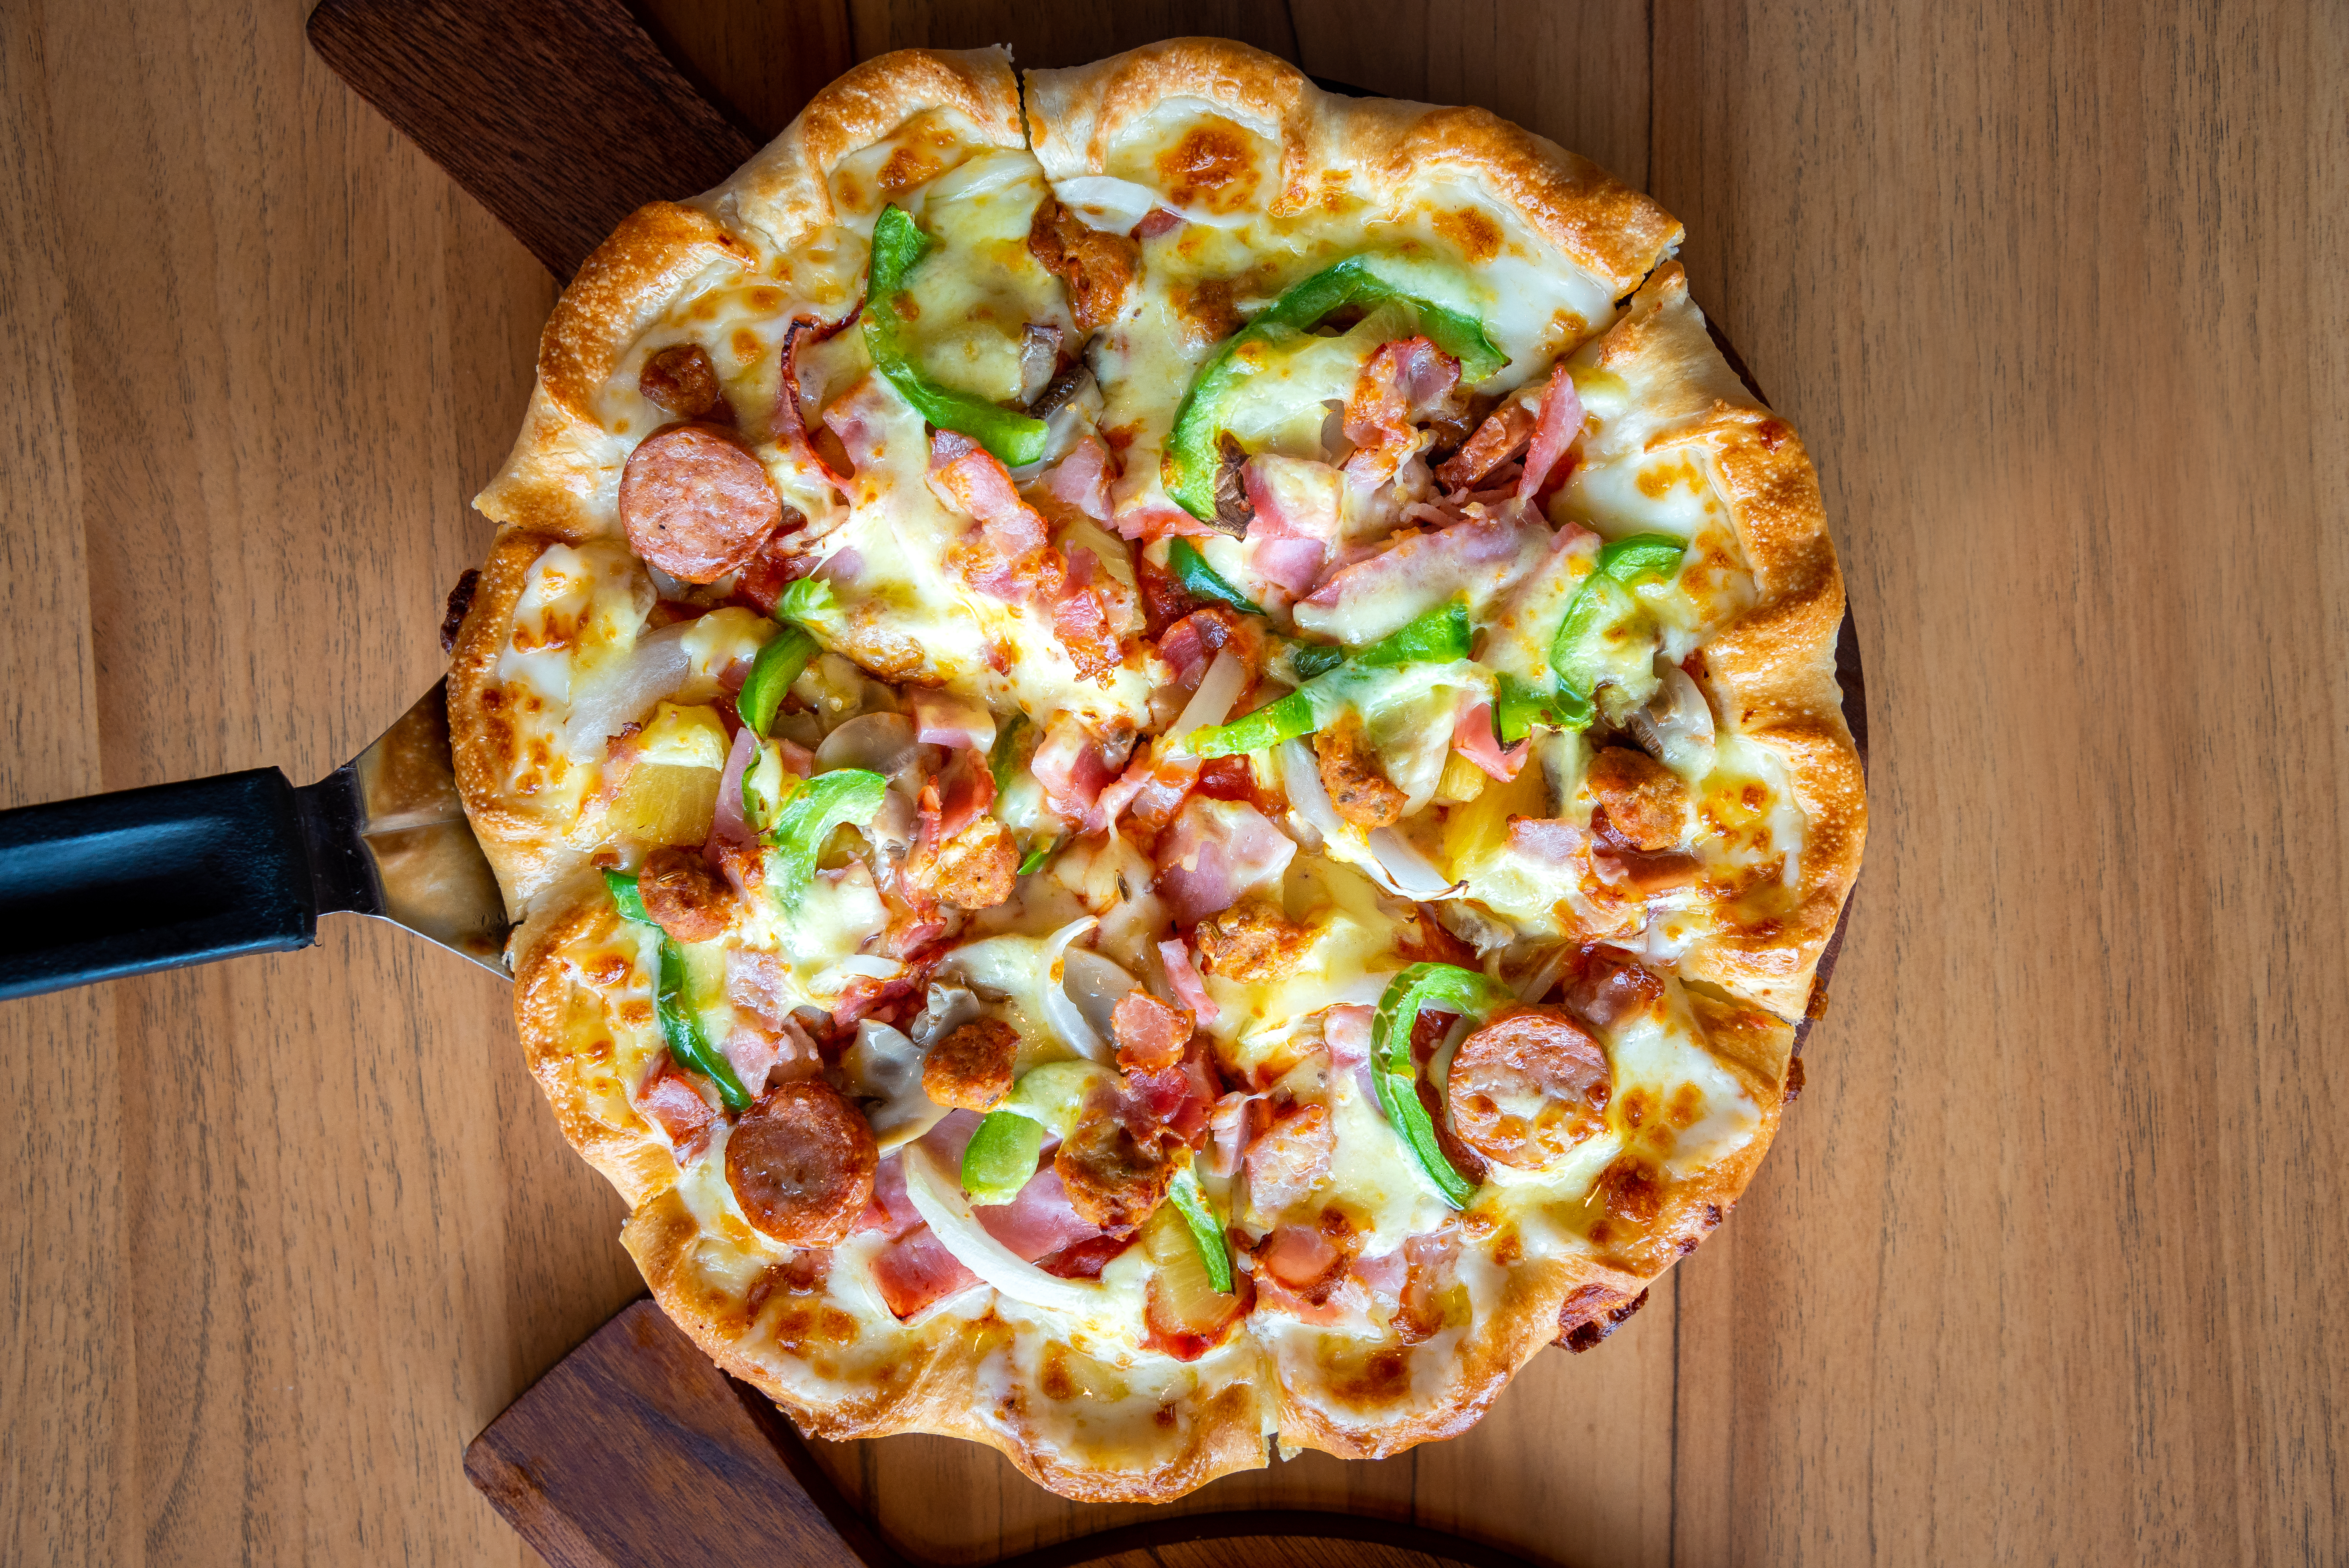
The Angeleno

Special Equipment

  • Pizza Screen

Base Recipe

Toppings

  • 1 lb Hot Italian Sausage, ground or in casings
  • 1 Anaheim Pepper, chopped
  • 1 Red Onion, sliced

Preparation

  • Follow the base recipe, everything is the same, including pulling the pie out and grating the parmesan cheese over the pizza and baking it for an additional 1-2 minutes.
  • Topping order does matter, believe it or not. You always start with the flat meats first – pepperoni, salami, ham, then move on to bulkier items – crumbles like beef or sausage, mushrooms, chopped peppers – and finish off with smaller, lighter toppings such as diced onions or sliced olives.

    Anchovies stay in the low boy and are placed on last while you try not to gag. Plastic forks, rosary water, and burning sage help. Or, just get friends that don’t like anchovies on pizza.

Plating Notes

  • Garnish with crushed red pepper, it pluses the whole thing. Scouts honor.

This post is dedicated to the victims of the Los Angeles Fires. To the families who lost homes, memories, and pieces of themselves in the smoke. To the neighborhoods that burned and the ones that held their breath. To the first responders who moved toward the heat while we fled. And to every Angeleno who looked up at an orange sky and still found a way to feed someone, comfort someone, or keep moving.

We are LA. Sprawling, pulsing, grieving, rebuilding. And still cooking.

Nom on,

~Crunchy

The Case of the Disappearing Tequila-Habanero Spiced Pineapple Wontons

In case you are wondering why I have no picture for you, it’s because twice I made these, twice I served them to guests to give me feedback on my new recipe with the warning not to eat them all because I still needed a picture, and twice I turned around about 3 minutes later to see an empty plate where my wontons should be.

“Hey!,” I exclaim, “You were not supposed to eat them all before I took a picture!” The individual who swiped the last one chews more quietly, looking anywhere but at me. I sigh, “Never mind, I’ll make another batch later….” Except the spousal unit drank the last of the tequila and the rest of my pineapple went into a pineapple-blueberry wonton so it’s going to be awhile before I make these again. Given how delectable they are, I figured I had better share the recipe before your next party.

Missing

Tequila-Habanero Spiced Pineapple Wontons

Ingredients

  • 1 cup pineapple chunks
  • 1 habanero pepper, finely diced
  • 1 cup tequila (The best you can afford)
  • 4 oz cream cheese, softened
  • 1/2 small, red onion, diced
  • 2 tbsp cilantro, diced
  • 1/2 pkg wonton wrappers
  • 1 egg, beaten

Preparation

  • Finely dice the habanero pepper. Add your pineapple chunks to a small tupperware container and add the tequila and diced pepper. Cover and give the mixture a shake to make sure its distributed. Let the pineapple soak for a few hours. You can even leave these soaking for a few days if you want a stronger flavor.
  • Once your pineapple is ready, extract the chunks and finely dice them. Set aside.
  • Place your softened cream cheese in a medium bowl, and using a hand mixer, whip until soft and fluffy.
    If you are unfamiliar with whipping cream cheese, start the blades on slow and circle around a few times. The cheese will start to cling to the blades. Put the speed to high and beat against the side of the bowl in a circular motion and the cheese will come loose as it becomes soft and whipped.
  • Finely dice your onion and cilantro.
  • Add the diced pineapple, cilantro, and onion to the cream cheese. You should also add in the diced habanero from the marinade. Combine and stir with a rubber spatula until you have a well blended mixture.
  • Preheat the oven to 400 degrees and lay out your wonton wrappers. Start with 12 wrappers.
  • Beat your egg in a small bowl and set aside.
  • Place approx 1 tbsp of the mixture into the dead center of the wrapper.
    Use any manner of deep breathing techniques and chanting of ‘a little dab will do ya’ to resist the urge to add larger and larger globs of filling to the wontons. It will look like you didn’t put enough, but I promise it’s correct. The filling expands in the heat and will burst your wonton open.
  • Dip your finger in the egg and trace around the edge of each wonton. Fold the sides into an X and pinch together to seal.
  • Spray a little non-stick on a cookie sheet and transfer the wontons. Make sure they are evenly spaced apart.
  • Bake the wontons for 10-12 minutes until lightly golden and crisp.
  • Serve immediately.

What do you recommend as a dipping sauce? 

I can’t figure this part out. The flavors are so fusion. Do you want spicy? Do you want sweet? Do you want an asian sauce or a salsa? I offered 2 options and what I noticed is that my taste testers had very different preferences when they tried each sauce and then just started popping them in their mouth, sans sauce, at an increasingly rapid pace. Here’s what I made for your experimenting pleasure.

If you want to offer something with sweet notes, maybe you can rock a ponzu? If you try that, let me know how it goes!

Warning: Make sure you hold back one or two wontons before you serve these or you may find yourself lost in a godzilla-like rage similar to what we all feel when someone eats the last spring roll without asking if anyone else wanted it.

Nom On,

~Crunchy

3-Alarm Chili

I’m at yet another potluck, and someone is staring down at my chili with a confused look on their face.

“This looks like chili.”
“Yeah,” I say, “it is chili.”
“uh….with pasta? How does that work?”
“It just does,” I assure them. 

I found the base recipe years ago in a Betty Crocker vegetarian cookbook and have been hooked ever since. Once people get over their confusion and try it, I always get rave reviews—and you’ll love it too. The dish has a great spicy heat that you can dial up to suit your taste. The cinnamon in the sauce makes it especially comforting and aromatic in colder months. It’s chili-licious.

3-Alarm Chili

Special Equipment 

  • Dutch Oven

Ingredients

  • 1 tbsp Extra Virgin Olive Oil
  • 1 large white onion, chopped
  • 1 medium pepper (Heat Control: Green bell pepper for mild, Pasilla or Anaheim for medium, 2 large jalapeño peppers for hot, or 2 Serrano peppers for sadists.)
  • 3 cups water
  • 1/2 cup taco sauce (Heat Control: The hotter the taco sauce, the hotter the dish. Just be aware that this is the tomato-based taco sauce, NOT a pepper sauce like Tabasco.)
  • 2 cans diced tomatoes and chilis, undrained (Heat Control: Ro-Tel sells 4 versions of heat – Mild, Original, Hot, and Lime.)
  • 2 tsp chili powder
  • 1/2 tsp salt
  • 1/4 tsp pepper
  • 1/4 ground cinnamon
  • 1 can pinto beans, drained and rinsed
  • 1/4 box angel hair pasta

Optional Add-Ins:

  • Canned corn; adds a bright, sweet, crunchy contrast
  • Smoked Turkey Sausage; Adds fat, umami, savory notes, and checks the box if you prefer meat in your chili

Preparation:

  • In a dutch oven or a large, deep skillet, sauté the onions and bell pepper in EVOO until soft and translucent, about 4 minutes. 
  • Add in the water, cans of tomato and chiles, sauce and seasonings. Just hold off on the beans and angel hair pasta.
  • Bring to a boil and then reduce to medium-low heat. Simmer for 5 minutes.
  • Add in the beans and pasta and return to boiling. Reduce back to medium-high heat. Simmer for 8-10 minutes.
  • Serve with garnish assortment so people can doctor their chili up as desired.

Garnish Assortment

  • Sour cream
  • Cilantro, roughly chopped
  • Sliced, fresh jalapeño
  • Pepper sauces: Franks, Tabasco, Tapatillo, and Sriracha
  • Shredded cheese: Cheddar, Pepper Jack (for added heat), or Gouda—because this dish is already kinda whack, so why not add nuttiness?

Serving options

  • Summer version: Increase the heat and serve with tortilla chips, Frito scoops, and Tostito bowls. Pair with ice-cold light beer to balance the spice.
  • Fall comfort: Keep the heat mild and serve with skillet cornbread. There are many styles to explore—buttermilk, bacon, Southern, Northern.
  • Sweet-savory contrast: Make the chili moderately spicy. Prepare cornbread with honey and maple syrup instead of sugar. Serve on the side for dipping and scooping.

What’s a Trencher?

A trencher is a thick slice of bread placed in a bowl and drenched with chili or stew. You can eat it with utensils or go full medieval and use your hands.

What’s a Dutch Oven?

When I first started cooking, I didn’t know what this was. I asked around and got conflicting answers. Here’s the correct one: a Dutch oven is a deep pot with a tight-fitting lid. Mine has a lid that doubles as a skillet. It’s economical, durable, and built to last.

Nom on, 

~Crunchy

Salsa Roja de Chile de Arbol: Guadalajara’s secret sauce

It’s years back, my waistline was drastically smaller, and my husband, also skinnier, was still a boyfriend. We are at his mother’s house and I see 5 brown faces staring at my pasty, white one with a mix of anxiety and that smile we get when we are expecting to burst out laughing at any moment. A torta stuffed with beans and pork and completely drenched in this neon red sauce sit before me. Behold, the tortas ahogadas, a Guadalajarn treasure most anglos who call themselves Mexican Cuisine aficionados never even hear about. Only Alex’s mom, Maria, doesn’t look like she is going to laugh. She looks terrified because I told her not to hold back, but to drench the torta in the salsa roja as was the tradition. “I can handle it,” I promised.

Now was the moment to demonstrate my spice-eating chops. I cut off a big, heaping chunk of torta, the crowd draws a breath, and I chow down. I close my eyes as all sorts of awesome stuff starts happening in my mouth – heat and savory and, and … holy shit THAT’S HOT! I immediately grab my beer and suck down half of it in two gulps, getting an instant buzz. I look at the crowd with a big, dopey smile on my face and go back for more. ‘I can’t believe you can eat that!’ proclaims Alex’s younger brother, Jorge. ‘I just eat it with tomato sauce!’ I smile at him. “Well,” I say, “That settles it. I am more Mexican than you.”

It’s taken me years of experimentation and some coaching from Maria, but I am ready to share this amazing salsa with you. If you want to make it for dunking tortas, you will want a more watered down version of this, but otherwise it’s a great way to add heat and flavor to any dish that you want a salsa or hot sauce for. Buen provecho!

Salsa Roja de Chili de Arbol

Salsa Roja de Chili de Arbol

Ingredients

  • 30 dried chili de arbol peppers (located usually in the aisle with all the hanging bags of dried Mexican spices and specialty items)
  • 2 cups of water
  • 1 garlic clove, peeled and quartered
  • 1 8 oz can tomato sauce
  • 2 tsp vinegar
  • 1/2 tsp salt
  • 1/4 tsp pepper

Special Equipment

  • Blender or food processor
  • Fine mesh strainer
  • 1 corn tortilla

Preparation

  • In a medium pot, add water and dried chili peppers. Bring the water to a boil.
  • Boil the peppers for 5 minutes.
    • *Note: Rehydrating these extremely spicy peppers expels oils into the air that agitates eyes, nose, and throat. Turn on the vent fan and open the windows/doors. Babies and toddlers are especially annoyed by these fumes, so if you have the option to keep them in a different part of the home, that’s helpful. I have a tendency to prepare dishes that require broiling or dehydrating chili very early in the morning when everyone is asleep.
  • Turn off the flame and cover the pot with a well fitted lid. Let the chilis soak for about 20 minutes.
  • Add the chilis and about 1 cup of the chili-infused water to a blender. You can use a stick food processor in a large, plastic measuring cup too, if that’s handy.
  • Cut the garlic into quarters and toss in to the blender, along with the can of tomato sauce and vinegar.
  • Blend the ingredients together. Add 1/2 tsp of salt and pepper and blend a bit more.
  • Grab the corn tortilla, tear into shreds and taste. From here, you will want to keep adding salt at 1/8 tsp at a time, blending, and tasting until you are happy with the heat and flavor.
    • *Note: The bland corn tortilla will help you discover the right salt ratio to achieve the flavor you find appealing. If you use a salted chip for your taste test it will mislead you.
  • Place the fine mesh strainer over a measuring cup and add the sauce in batches. Using a spoon, press down on the seeds and pulp to push the liquid through. You can either save the seeds and pulp to make another dish with the spicy chili paste, or discard.

If you are really a spice fanatic, serve the salsa unstrained and you can eat with chips, but I think most will enjoy this as a garnish on tacos, quesadillas, chili, even a dollop in their soup if they want some kick. It’s sure to become your new favorite hot sauce.

Nom, with sizzle, on,

~Crunchy

Mango-Habanero Salsa

Ah, the mango-habanero marriage. Bright, fresh heat that bursts through your mouth and nose like the sun warms your skin when you turn your face up to it. Yeah; yeah I am being poetic because what’s happening when you mix orange habenero peppers with ripe mango is f**king amazing. Throw in some pineapple, cilantro, lime juice, and red onion….dear god.

So, how do you get that action? I love a good salsa, so let’s start there.

Mango-Habanero Salsa

Mango-Habanero Salsa

Special Equipment

  • Blender or Food Processor

Ingredients

  • 1 medium tomato, chopped
  • 2 habanero peppers, chopped
  • 2 tablespoons cilantro, chopped
  • 1 small, ripe mango, chopped
  • 1/2 cup chopped, red onion
  • Juice from 1 lime
  • Salt to taste

Preparation

  • Set out your blender or food processor and add all of the ingredients to it.
  • Depending on how you like your salsa (chunky or smooth) process it until you are happy with the texture.
  • Transfer to a bowl or Tupperware and refrigerate for at least 2 hours.

Ok, I have salsa, so now what?

Well, my friend, I will list the pairings in order of raddness with this salsa.

  • Shrimp
  • White, mild fish
  • Shredded chicken
  • Shredded pork
  • Diced chicken
  • Diced pork

You can also just scoop it up with chips and make the magic happen that way.

But what would be the ideal recipe for this?

Pineapple and Shrimp Street Tacos

Ingredients

  • 1 pound fresh shrimp – de-shelled and tails removed
  • 1 8oz can diced pineapple chunks, drained
  • 1 medium vadalia or other sweet onion, chopped into large chunks
  • Chopped cilantro
  • Extra virgin olive oil or Grapeseed oil
  • Corn Tortillas
  • Salt and pepper

Preparation

  • You can either use a standard outdoor grill, an electric grill, or a cast iron stove top grill, depending on what you have available.
  • Brush oil all over your ingredients, except cilantro. Season with a dusting of salt, and then pepper.
  • With a paper towel, rub a little oil on your grill space if you are using an electric or cast iron stove top grill.
  • Once your grill is hot, spread your ingredients, except cilantro, on the grill and cook for approximately 3 minutes per side. The goal is to lightly char the veggies and cook the shrimp until it is translucent.
  • While your fillings are cooking, heat up your tortillas over an open burner on your stove. Store them in a tortilla warmer until you are finished heating them all up.

Pineapple and Shrimp Skewers

  • The prep is almost identical, but for ingredients, buy pineapple rings and chop them in larger chunks, in some cherry tomatoes, and cut the sweet onion into large chunks.
  • Thread on a wood skewer soaked in water or a metal skewer and brush with olive oil. You can sprinkle salt and pepper, too, if you like.
  • Heat on your grill for about 3 minutes per side to char the veggies and get the shrimp translucent.

If you want a really light dish, just serve each person two tacos (or skewers) with the salsa spread over them and sprinkled with cilantro. If you need some starch to keep you full, I recommend a plain rice, like basmati, with a little butter and salt. You have so much flavor, just don’t make a starchy side with loads of spice to compete with your main course.

Nom On,

~Crunchy