Mon Petit Parfait

People who will devour a gallon of ice cream in one sitting, eat a slice of cake the size of their head, or have three donuts for breakfast have always confused me. I just don’t have that kind of relationship with sugar. For me, whatever language you want to use – dolche, bonbon, a sweet – it should be that je ne sais quoi at the end of a meal or a long day; that breathy, little kiss goodnight.

I have a lovely little confection for you that you can whip up in less than 15 minutes and will promise you that lovely, little kiss goodnight. It’s light, delicate, and extremely versatile depending on the ingredients you have on hand.
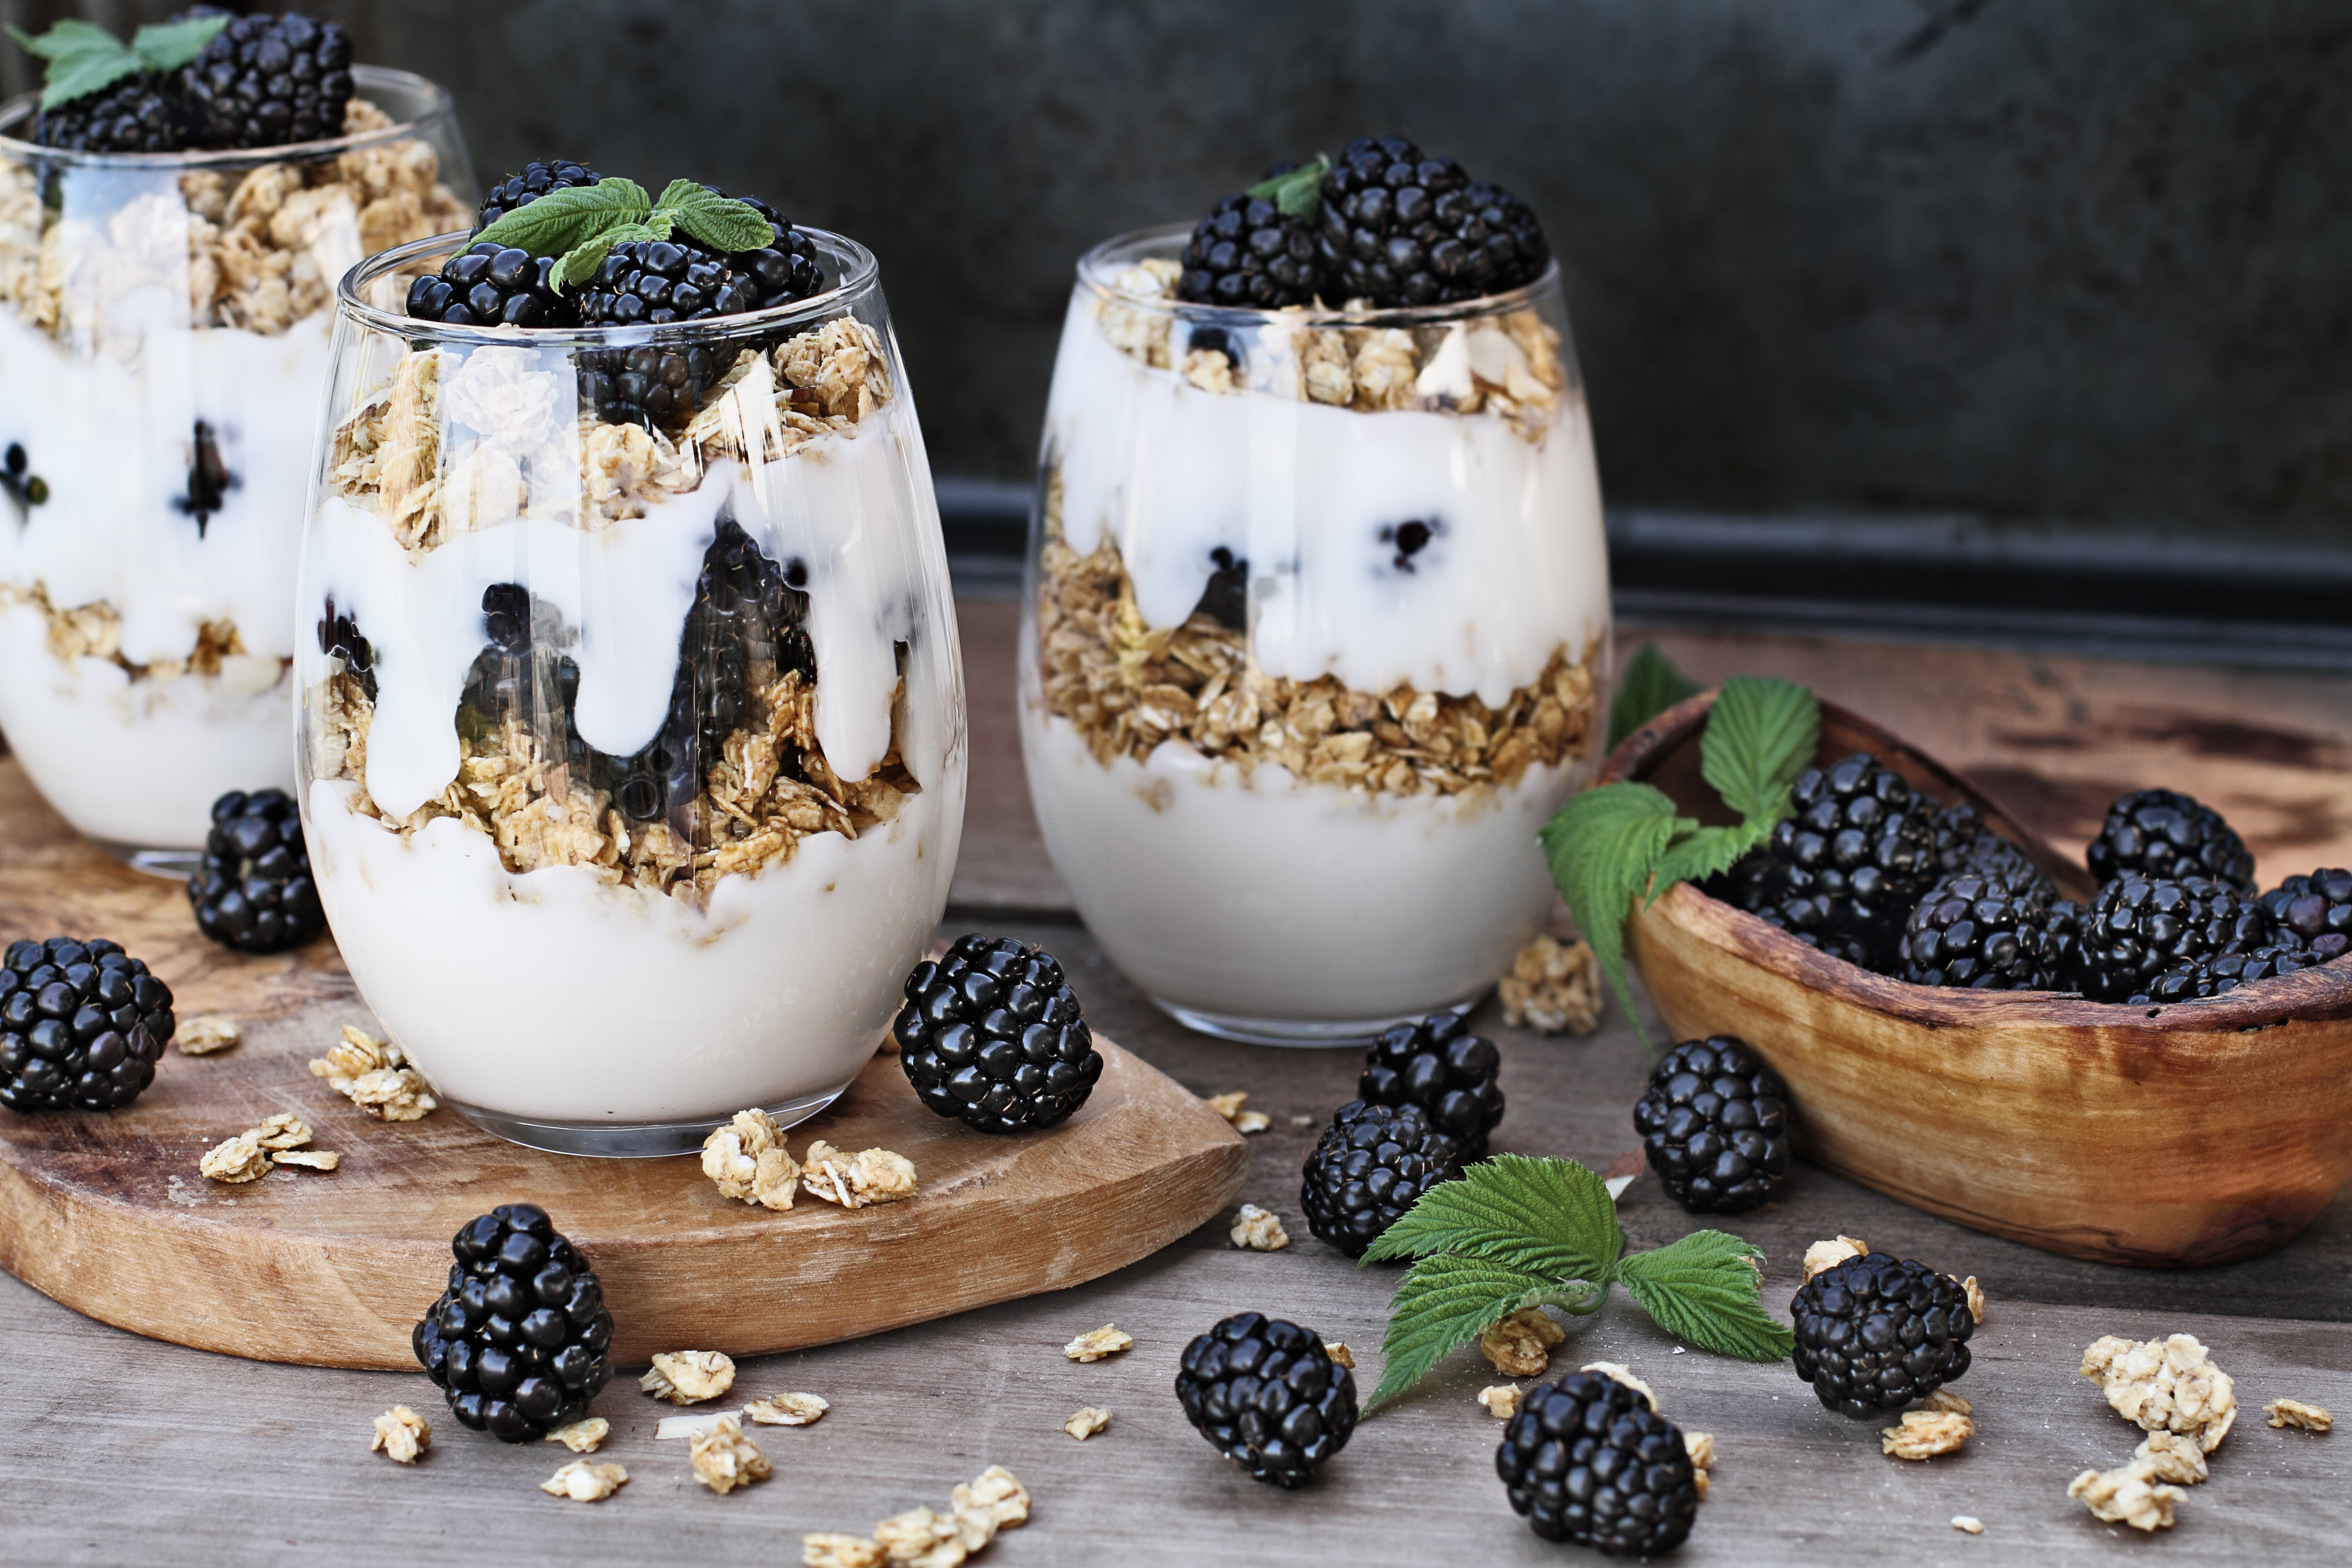
Mon Petit Parfait

Ingredients:

  • Fresh Whipped Cream
    • 1 Cup Heavy Whipping Cream
    • 2 Tbsp Sugar
    • Chilled Stainless Steel Bowl and Hand Mixer Blades
  • Berries: You need to go fresh and seasonal. This is the first layer of your flavor that you will base your additional ingredients off of.
  • Herbs: Depending on what you are making, mint, basil, or lavender paste could provide complex additions to your parfait.
  • Texture: This is where you pair your flavor and things get really fun. Think cereals, crumbled-up crunchy cookies, or crumbled-up pie crust. The goal with this layer is a flavor that plays off the fruit, but a texture that juxtaposes the rest of the ingredients.

    Note: I don’t recommend cake or soft, chewy cookie crumbles because between the cream and the fruit, you might end up with a parfait that is less than exciting if you make all the layers soft. You really are looking for a flavoring pairing, BUT, a texture contrast.

Preparation:

  • Step One: In a small mason jar, cup, or glass, spread a layer of your freshly whipped cream. Layer it evenly on the bottom using a spoon.
  • Step Two: Next comes your texture. Crunch up your cereal or sprinkle in your granola or whatever you plan to use. Then add your layer of berries.
  • Step Three: Add another layer of cream, another layer of texture, and another layer of berries.
  • Step Four: Add your final layer of cream.
  • Step Five: Garnish with flair! I suggest a little topper of berries and a cookie to enjoy with your parfait.

Where can I cheat?

The heart of this dish is the fresh whipped cream, so please don’t cheat on that. It takes 5 minutes to make it and you have so much opportunity to infuse and layer your flavors by adding extracts to the whipped cream.

Baking your own cookies would be an amazing opportunity to further control the combined flavors of the finished product, but cookies from your store or local bakery will be perfectly delightful.

So what’s your favorite parfait, Crunchy?

Ingredients:

So there you have it! A very light, fresh, and delicious dessert you can whip together to delight your little one, delight your loved ones, or delight yourself.

Nom on,

~Crunchy

The Versatile Crepe: France’s anathema for anxiety

I’ve been making crepes for many years and for some reason I have hesitated to write this blog post. I think my ‘piece de resistance’ was the year I made crepes stuffed with Rosemary Turkey Breast, smothered with Sherry Shallot Gravy and drizzled with Cranberry Coulis. The crepe, while a delightful pain in the ass to make, is at once both humble and elegant.

But, Crunchy, why would you call it an anathema for anxiety? That seems a little …. I don’t know … bombastic? A Hyperbole? Grandiose? Well, my love of my thesaurus aside, I’m not wrong. No matter how cranky and anxious I’m feeling, 45 minutes of highly focused, yet surprisingly ‘chillaxy’ ladling and swirling later, I hate the human race at least 40% less. The end result is a tangible batch of perfect crepes ready to be stuffed, folded, drizzled, and smothered in any number of other delicious and decadent ingredients.

The Versatile Crepe

Equipment:

Ingredients:

*Don’t be Cheap! Alert: The French live and die by the care, quality, and technique that goes into … well, just about everything they do. You will commonly find French recipes to have very few ingredients because every one of them count. For the Milk, please go organic. For the eggs, free-range organic. For the salt, it needs to be kosher. Finally, for the butter, choose a high-quality brand. Just do the best you can and remember that the money you spend on the ingredients will make a huge difference in the quality of your end result.

  • 420 ml or 1 3/4 cups Whole Milk. Reserve an additional 1/2 cup in case your batter becomes too thick. You may need to add a little more as needed.
  • 4 Large Eggs
  • 1/2 tsp Kosher Salt
  • 190 g or 1 1/2 cups All Purpose Flour
  • 1 Stick Unsalted Butter. Melt 6 Tbsps of butter for the crepe batter. Reserve the remaining 2 tbsps from the butter stick for greasing your pan.

Preparation:

As I have mentioned, I have made crepes many, many times. I distilled the essentials of the batter preparation in the order that you need to construct it, and it goes like this:

  • Milk, Eggs, Salt. Blend.
  • Flour. Blend.
  • Melted Butter. Blend.
  • Shove blender carafe into refrigerator for 60 minutes.

And now to let all your worries swirl away for 30 minutes:

  • Heat your crepe pan on low heat. You don’t want your crepes to burn so I suggest about a level 2.
  • Drop a sprinkle of water. If it sizzles you are ready to party.
  • Take your remaining 2 Tbsps of butter and grease a piece of paper towel.
  • Gently coat your crepe pan with the buttered paper towel. (Don’t be Lazy! Alert: If you just grease your pan with the stick of butter you will end up with too much and it will result in over caramelization.)
  • Quickly dip your soup ladle into the batter and pour a circle that covers 3/4s of the pan.
  • Immediately pick the pan up and rotate it in gentle circles, allowing the batter to spread and thin out to the outer edges of the pan. If you end up with any little holes you can dribble a little additional batter there.
  • The crepe will take less than a minute to cook. You are looking for the edges to just start to dry up. I like to gently test if I can slide my spatula underneath the crepe after about 30 seconds.
  • Flip the crepe over. Don’t be alarmed if you need to help it out a little with your hands. They are difficult to flip so don’t think of it like a pancake. I usually have to help the little dude out by readjusting it. Cook the second side for about 15 seconds.
  • Slide it onto a waiting plate.
  • Repeat the cycle for another blissful 30 minutes.

*Don’t be Distracted! Alert: Unless someone is bleeding or on fire and there isn’t another individual in the house who isn’t bleeding or on fire also that can deal with that situation, this is all you are going to be doing. Period. It’s just you, a heated crepe pan, carefully pouring, swirling, delicately flipping, sliding onto a plate. Repeat. Repeat. Repeat.

“Wait, why was I having a bad day again?” You’re welcome.

Ummm, What Should my Crepes Look like?
If you want to make a traditional crepe, it should be very thin and pale as the driven snow. Ok, maybe not the snow, but you get the idea. The reality is, butter browns. If your crepes have some color on them, fear not. They will still be delicious, I promise. But as you work your way through your batch, that is what you are looking for.

Nom On,

~Crunchy

Summer Berry Compote

Do those gorgeous pallets of raspberries, blackberries, strawberries, and blueberries that are in just about every stall at the farmers market during the summer entice you as much as they do me? They are so pretty! I just get all dizzy with fantasies of mixed berry tarts and sundaes and pies, oh my! But tarts and pies take forever, and lets face it, we’ll probably be too drunk from our sippy-sippy while we cook to finish anything that delicate and time consuming. Am I right? Well, that’s why the good lord invented compotes. Great on sundaes, waffles, pancakes, sponge and pound cakes, or as a side to dip your butter cookies in, the reasons to make a compote are endless. And it’s ok if you are drunk by the time you pour it over pancakes at 10 am. No judgement!

Mixed Berry Sundae

Seasonal Berry Compote

Ingredients

  • 1/4 cup sugar
  • 2 tbsp water
  • 2 cups mixed spring or summer berries
  • 1 tsp freshly squeezed lemon juice (which is approx. 1/2 medium lemon)
  • 1 pinch salt
  • 3 tbsp butter

Preparation

  • In a small sauce pan, bring water and sugar to a boil.
  • Reduce heat to low and add in the remaining ingredients, except the butter.
  • Return to a boil and stir a few times. 45 seconds boiling, tops.
  • Turn off the heat and add in butter. Stir until fully melted and combined.
  • Using a potato masher, crush berries until you have a nice lumpy sauce. Don’t over crush, just make sure all berries are broken down.

Now that you have your delicious compote, what you pour it on is up to you! It’s lovely served warm on ice cream, pancakes, waffles, etc, but you can also store in a jar in your fridge for a week or so and add to milk shakes and smoothies. It can also work well as a jam on toast and scones, or you can get a little freaky and make a squishy ice cream and compote cookie sandwich with Nilla wafers. Heck if you need to get fancy, make cream puffs, also known as profiterole, and fill them up. We’ll all be impressed.

Nom your sweet tooth on,

~Crunchy

Chicken Cordon Bleu Panini

Mmm….it’s Saturday again and we’re hungry. You know what that means…. Saturday afternoon lunch, ba-by! And on the board this time is a crispy, gooey, cordon bleu panini. Let’s do this.

Chicken Cordon Blue Panini

Chicken Cordon Bleu Panini

Special Equipment

  • Option One: Cast Iron Gridle + Cast Iron Skillet or Foil Wrapped Brick
  • Option Two: Panini Press

Ingredients (per sandwich)

  • 1 tbsp olive oil
  • 1/2  thin-cut chicken breast (at the deli, asked for a thin cut or find pre-packaged that is labeled thin cut)
  • Salt and pepper, to taste
  • 2 thick slices french bread per serving (from the bakery)
  • Butter or yogurt butter spread
  • 1 slice alpine lace swiss cheese (from the deli counter)
  • 1 slice black forest ham (from the deli counter)
  • 1 Tbsp Dijon mustard
  • 1 Tbsp Mayo

Preparation

  • Slice your thin cut chicken breast into strips and then cut in half. Season with salt and pepper.
  • In a small pan, heat your olive oil over a medium flame and toss the chicken strips in there. Stir a few times to get a little sear and then cover the pan with a lid. Heat through about 3-4 minutes. Turn off the flame and transfer to a bowl. Set aside.
  • Butter bread slices and place one slice in a pan or on a cast-iron griddle, buttered-side down. Layer with swiss cheese, then ham, then chicken. Top with bread slice.
  • Heat the first side until you get nice grill marks, light brown or black, depending on how much crisp you want on your crust.
  • Flip over and heat the second slice until grilled and cheese is starting to melt.
  • Transfer to a plate or cutting board and remove the bread slice that doesn’t have cheese melted to it. Add either a tbsp of mayo, dijon mustard, or a tsp of each. Add back to your sandwich.

This is a dense and flavorful sandwich so you can just eat the hell out that on its own. Pair with pickles, salt and pepper dusted tomatoes, or even a little salad if eating a sandwich with no side freaks you out.

Nom On,

~Crunchy

Carrot Cupcakes: Ohhhh yeah…..

Ah, carrot cake… Is there anything better? All you people with your red velvet and cheesecake obsessions need to take this dollar I’m holding down to the corner and buy yourself a clue. But then, if you make a cake you have this behemoth darkening your fridge. The solution? Well, it’s me so I think the solution is always found in a cupcake pan.

Carrot Cupcakes

Ingredients:

For the cupcakes….

  • 2/3 cup grapeseed oil
  • 1 1/2 cups grated carrots
  • 1 cup flour
  • 3/4 cup sugar
  • 1 teaspoon cinnamon
  • 1 teaspoon baking soda
  • 1/2 teaspoon baking powder
  • 1/4 teaspoon salt
  • 2 eggs, beaten

For the not-too-sweet frosting ….

  • 4 ounces cream cheese
  • 4 tablespoons butter
  • 2/3 cup powdered sugar
  • 1 teaspoon vanilla
  • Nutmeg

Preparation:

  • Wash and skin the carrots. Grab a cheese grater and put on a good audio book while you grate the carrots. If you have one of them fancy food processors, you can use that and save time. I like to save to save space, thus the audio book.
  • Pre-heat the oven to 350 degrees.
  • Once the carrots are grated, combine them in a small bowl with the oil.
  • In a large bowl, combine all the dry ingredients. Make sure you don’t add the eggs.
  • Now, with the dry ingredients mixed, fold in the carrot-oil mixture and take care not to mix it much. You want the batter folded, not mixed.
  • Beat the eggs separately and then fold those in, too. Stir the eggs into the batter just a little, 10-15 swipes of  your spatula.
  • Line a 12-cup muffin pan with cupcake liners and then, using an ice cream scoop, divide the batter evenly among the muffin cups.
  • Bake for 13 minutes or so. They should be spongy on top and a golden-brown color.
  • Once baked, allow the muffins to cool.
  • Mix your frosting ingredients in a medium-sized bowl and beat at medium speed with a hand-mixer, until light and smooth.
    Note: If you cream cheese is a sticky mess in your mixing blades, turn the speed up and rove around the edges of the bowl. The speed will free the mixture from your blades and get it nice and smooth.
  • Using a rubber spatula, transfer the frosting into a plastic sandwich bag and snip off one edge. Pipe the frosting onto the cupcakes and lightly dust with nutmeg.
  • Hand off the mixing blades to your clean up crew, as available.

Clean up crew

Serve at room temperature, or you can refrigerate them for a few minutes if you want the frosting to be a little firm.

Be prepared to make these often, as they are seriously delicious. I don’t have a big sweet tooth, and thus I modified the original recipe I found at Pinch of Yum to be a more balanced and mildly sweet cupcake. I finally had a proper dessert that kept me coming back for more. If you do like really sweet stuff, just up the powdered sugar in the frosting to 2 cups and call your dentist.

Nom on,

~Crunchy