Cinnamon Buns (of Oblivion)

Cinnamon buns really piss me off. You see, I am extremely intolerant of sugar. I can never remember if its hypo or hyperglycemia. I just know that two Cosmopolitans had enough sugar in them to knock me out cold sitting in rock hard seats in the nose bleed section outside at a White Zombie/Ozzie Osborne concert on a blustery November night. Oh yeah, that happened.

So you can imagine how much I have to avoid sugar. An interesting problem, since I love to bake. I can enjoy the wonderful smells at least, and the smiles my cookies and cakes give to others. Not so with the smell of freshly baked cinnamon buns. I always break down and eat a half of one. Then I sink into black oblivion, the gooey evidence of my trespass clutched in my sticky hand. If you want to join me there, friends, just follow the cinnamon and cream cheese frosted road…

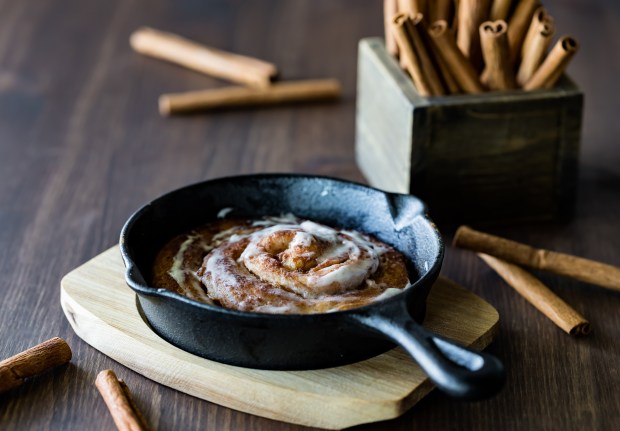
Cinnamon Buns with Cream Cheese Frosting

Ingredients

  • 2 oz Cream Cheese
  • 3 oz Butter
  • 1 1/2 cups self-rising flour
  • 8 oz Greek Yogurt
  • 1/2 cup powdered sugar
  • 1 1/2 tsp Ground Cinnamon
  • 1/3 cup Light Brown Sugar
  • 1/4 tsp Salt

Preparation

  • Place butter in a small bowl and microwave for 30-60 seconds, or place in a small pot and melt over low flame. Once its mostly melted, set aside. It will be fully melted by the time you need it.
  • Add self-rising flour to a medium mixing bowl along with 2 Tbsp of melted butter. Add in the yogurt, 1/4 cup of powdered sugar, and 1 Tbsp of water.
  • Mix with clean hands until you have a shaggy dough.
  • On a flat work surface, like a large wooden cutting board or marble counter top, sprinkle liberally with bench flour. Coat your hands liberally, too. Add some more flour to a bowl and keep it handy. You’ll need it.
  • Turn out the dough onto your work surface and knead into a smooth and slightly sticky ball. You may need to sprinkle the dough with flour or coat your hands a few times during this process. Let the dough rest (being kneaded is hard work, after all) for 5 minutes while you make the cinnamon mixture.
  • In a small bowl, combine the brown sugar, remaining butter, cinnamon, and salt.
  • Using a rolling pin coated in flour, roll out your dough into an 8 X 11 oval. Cover almost the entire surface with the mixture. I leave a very thin edge all the way around.
  • Starting on the short side, roll your dough into a cylinder. Cut into 6 equal slices.
CinnamonRollsPrep.JPG

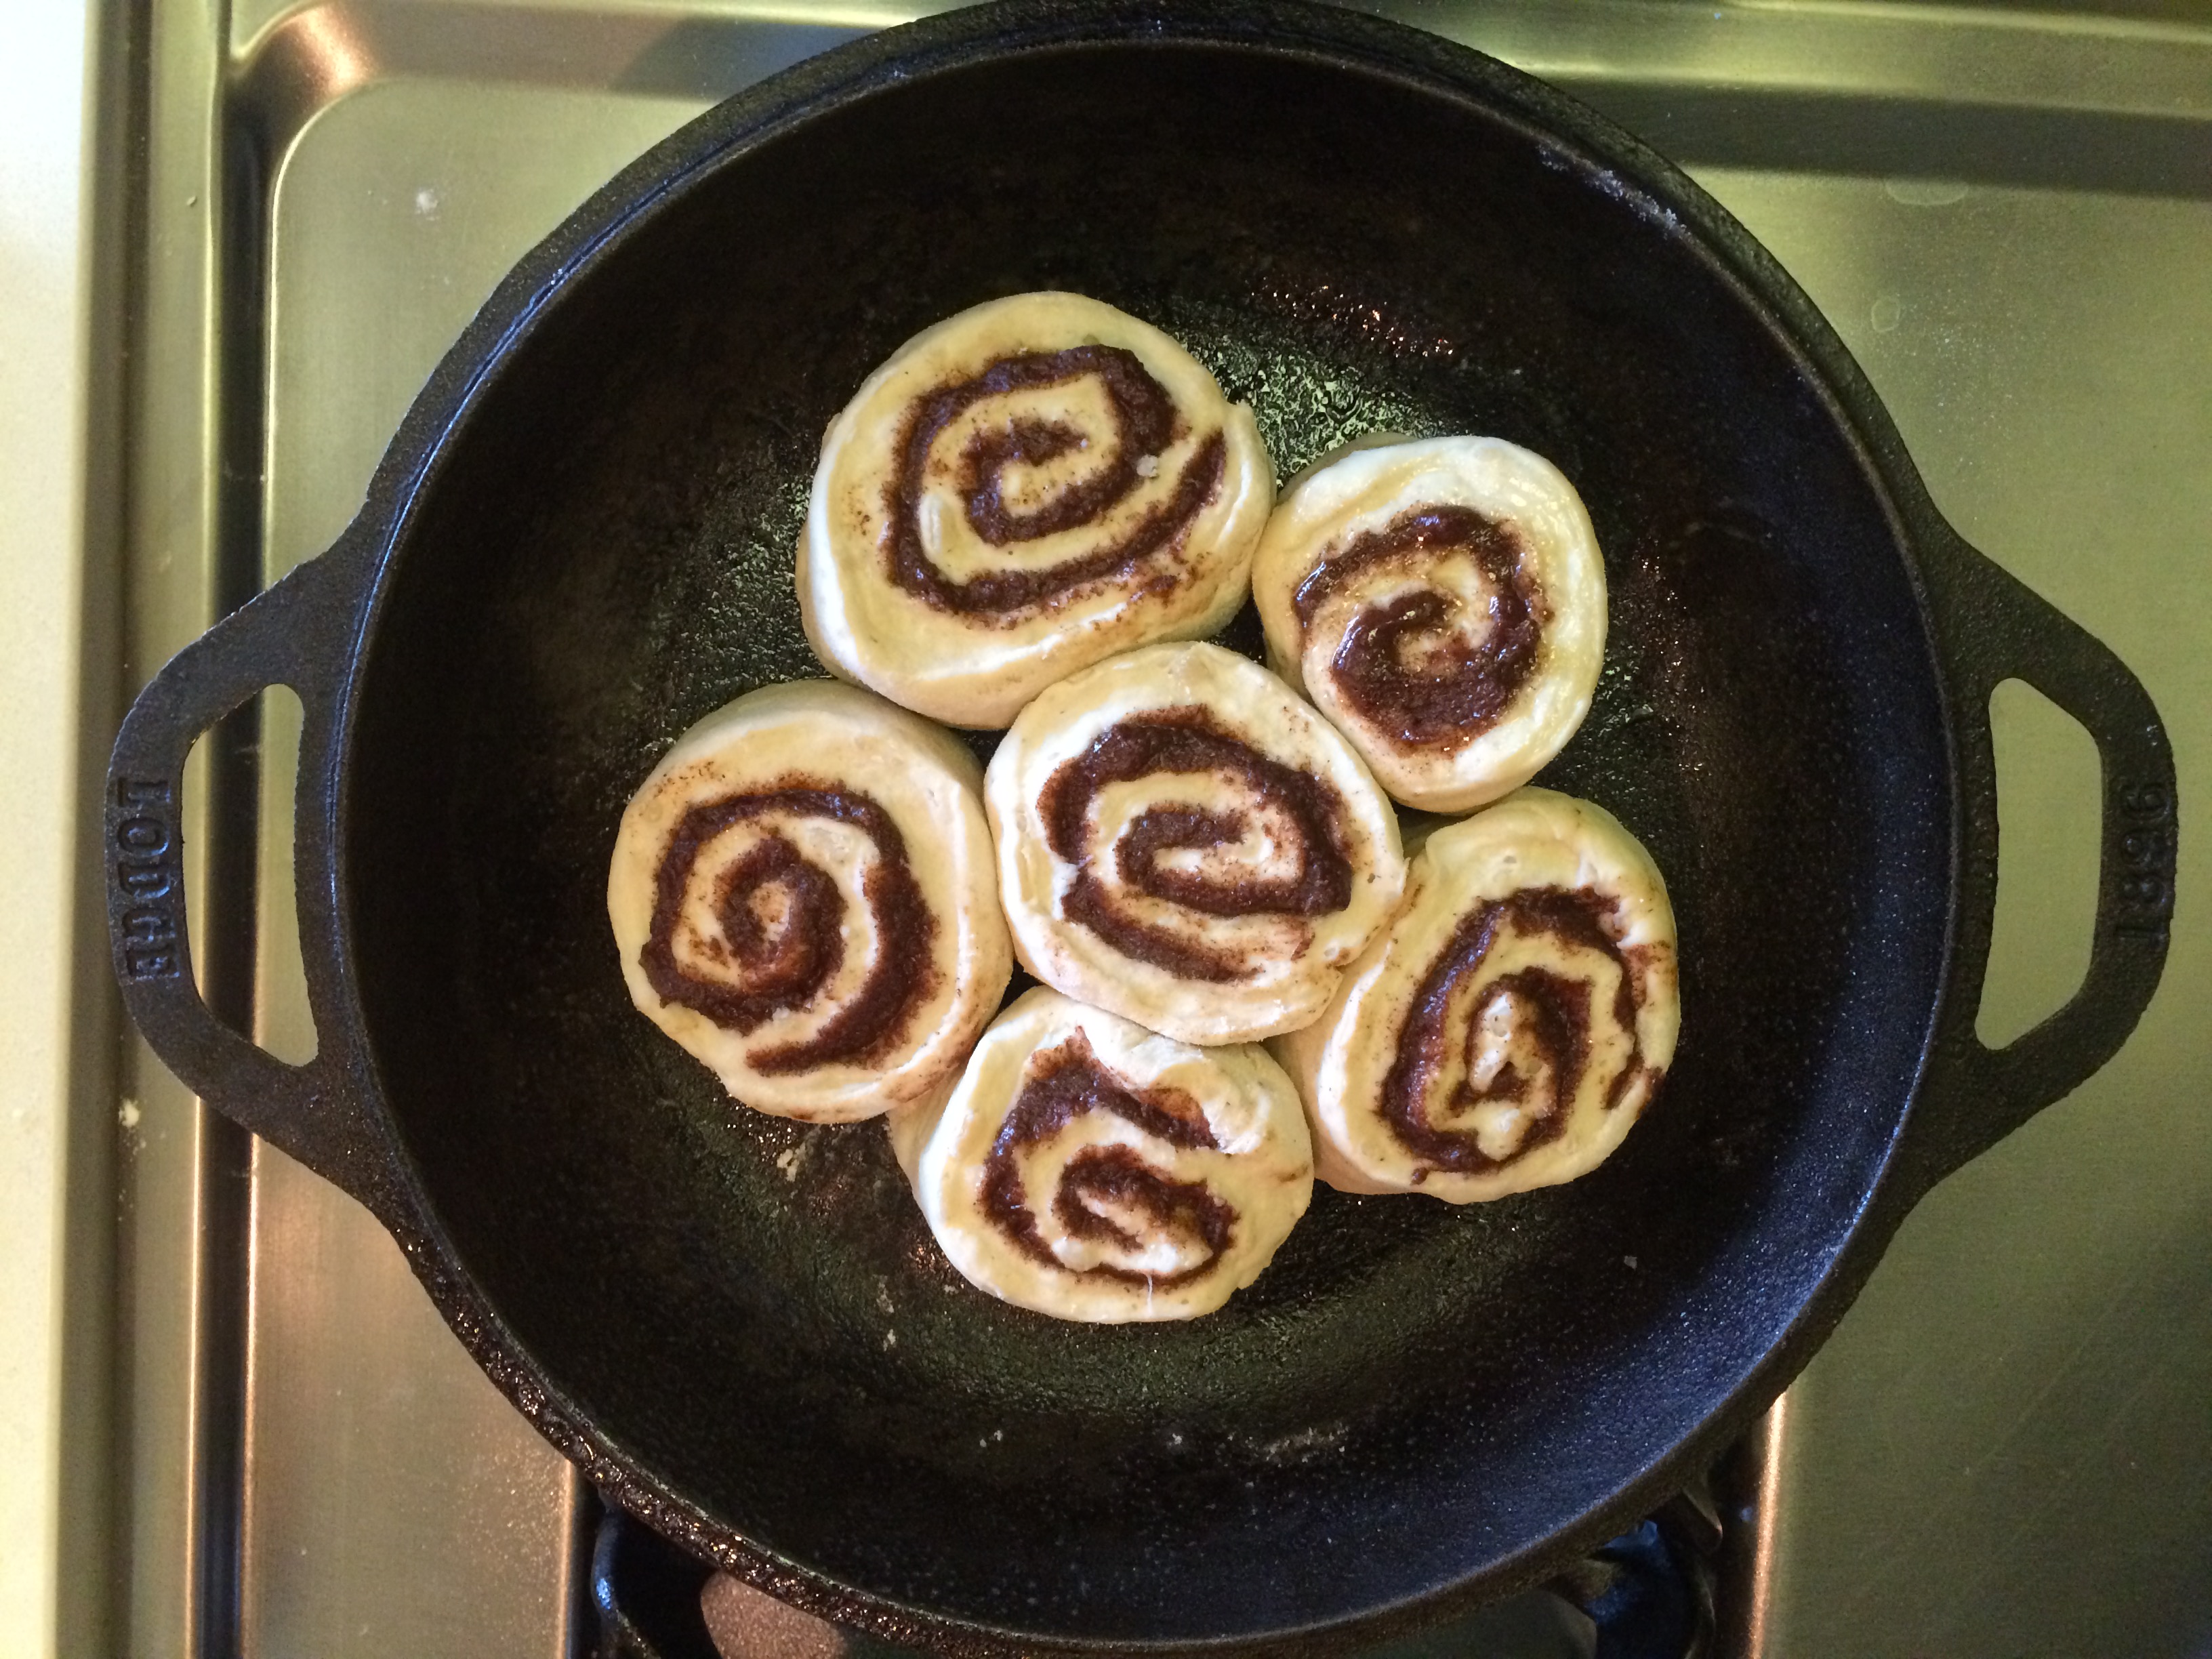
  • In a round baking pan or cast iron skillet, coat with a little oil or non-stick spray, and then assemble your slices into a tight ring with one slice in the center and the rest surrounding. They need to be snuggly pressed together to ensure the rolls don’t fall open during baking and the dough puffs upwards.
  • Bake the rolls at 375 degrees for 30-35 minutes. The tops should be lightly brown when done.
  • While the buns are baking, stir together the cream cheese, remaining powdered sugar, and 1 Tbsp of water. Stir the mixture until smooth.
  • Once the buns are done, I like to spread the frosting while they are still pretty warm so you get the drippy and gooey effect. If you like your frosting firm, let the buns cool first before you spread.

Oblivion awaits,
~Crunchy

Chicken Cordon Bleu Panini

Mmm….it’s Saturday again and we’re hungry. You know what that means…. Saturday afternoon lunch, ba-by! And on the board this time is a crispy, gooey, cordon bleu panini. Let’s do this.

Chicken Cordon Blue Panini

Chicken Cordon Bleu Panini

Special Equipment

  • Option One: Cast Iron Gridle + Cast Iron Skillet or Foil Wrapped Brick
  • Option Two: Panini Press

Ingredients (per sandwich)

  • 1 tbsp olive oil
  • 1/2  thin-cut chicken breast (at the deli, asked for a thin cut or find pre-packaged that is labeled thin cut)
  • Salt and pepper, to taste
  • 2 thick slices french bread per serving (from the bakery)
  • Butter or yogurt butter spread
  • 1 slice alpine lace swiss cheese (from the deli counter)
  • 1 slice black forest ham (from the deli counter)
  • 1 Tbsp Dijon mustard
  • 1 Tbsp Mayo

Preparation

  • Slice your thin cut chicken breast into strips and then cut in half. Season with salt and pepper.
  • In a small pan, heat your olive oil over a medium flame and toss the chicken strips in there. Stir a few times to get a little sear and then cover the pan with a lid. Heat through about 3-4 minutes. Turn off the flame and transfer to a bowl. Set aside.
  • Butter bread slices and place one slice in a pan or on a cast-iron griddle, buttered-side down. Layer with swiss cheese, then ham, then chicken. Top with bread slice.
  • Heat the first side until you get nice grill marks, light brown or black, depending on how much crisp you want on your crust.
  • Flip over and heat the second slice until grilled and cheese is starting to melt.
  • Transfer to a plate or cutting board and remove the bread slice that doesn’t have cheese melted to it. Add either a tbsp of mayo, dijon mustard, or a tsp of each. Add back to your sandwich.

This is a dense and flavorful sandwich so you can just eat the hell out that on its own. Pair with pickles, salt and pepper dusted tomatoes, or even a little salad if eating a sandwich with no side freaks you out.

Nom On,

~Crunchy

Chile Rellenos: Fried batter goodness

I think it’s safe to say that we all have our favorite dishes from any cuisine. And no matter how complicated and labor intensive it is to make it on our own, we anoint the dish worth the effort to learn. On this particular weekend, I decided that dish would be the Chili Relleno. After god knows how many hours, and god knows how many glasses of wine (I refuse to believe the wine delayed the process one bit,) the end result was stinging eyes, possibly a chili seed that got in my nose from itching it, a sense of pride, and a fully-bellied nap afterwards meant for the gods. It’s called, winning!!

Chile Rellenos

Special Equipment

  • Cast Iron Skillet

Ingredients

  • 12 pasilla or Anaheim peppers
  • 1 pd block of jack or pepper jack cheese
    • *Note: If you have a smoked cheese, this is the time to use it. Some basic grocery stores sell habanero pepper jack and farmers markets often have cheese merchants that sell some amazing smoked cheeses.
  • Grapeseed Oil
  • 1 cup milk
  • 1 cup flour
  • 1 egg
  • 1 tsp baking powder
  • 1 tsp baking soda
  • 1 tsp salt

Preparation

  • Roast chili peppers

There are a few ways to do this. You can either brush the peppers with olive oil and roast them under the broiler, you can put them in a cast iron skillet or on a cast iron griddle, or you can put them right on the burner. The goal is to char the skins and get the peppers soft and flaccid. ( Heh, heh, she said ‘flaccid.’)

Roasted Peppers

When the chiles are done roasting, put them in a plastic bag to steam for a few minutes. If you don’t have time to finish the project you can actually leave the peppers in the bag until you are ready to make your rellenos.

Steamed Chiles

  • Slice a small opening into the chiles and scoop out the seeds. Using a paper towel and over the sink with the facet trickling, scrap the chard skins off the peppers.
  • Cut the 1 pound of cheese into 12 strips of equal size.
  • Stuff each pepper with a slice of cheese and close them up.
  • Mix the egg, flour, milk, baking soda and powder, salt and pepper and whisk with a fork. Sprinkle flour on your cutting board or prep surface.
  • Pour a fair amount of oil into your skillet, up to 1 inch and heat over a medium-high flame. (Personally, I don’t like cooking with that deep an oil bath because it splatters like crazy and is wasteful. I don’t cook with cheap oil, so I pour enough in to make about 1/4 inch bath and it browns the batter just fine.)
  • Now comes the tricky part. With your skillet oil slightly smoking, take a stuffed pepper and roll it in flour, than dip into the batter. Place the gooey, dripping mess into the oil and fry. Using tongs, each side only needs a minute or less, so roll as gently as you can to brown all sides of your relleno.
  • Once all the batter is fried, use tongs and transfer to a plate. Repeat that exact process with each of your peppers.
  • Once you have all your peppers fried, you may need to pop them in the microwave for just a few seconds to make sure that cheese is melted inside. This will depend on how thick the slices of cheese were that you stuffed the peppers with and how deep an oil bath you used.

How do I garnish and serve the rellenos?

Ok, this dish is popular all over central and south America and garnish styles do vary. If you are used to eating your rellenos served drenched in a mild ranchera sauce, you can certainly do that. I have had them that way, sometimes baked with a little cheese on top of the sauce. I have had rellenos served almost as a soup, the tomato sauce more a delicate broth than a sauce.  However, there are some communities that serve the dish plain and offer salsa roja or salsa verde and maybe a little sour cream to garnish as you see fit. I recommend you try it WITHOUT a sauce bath at least once because they are amaze-balls.

Try to eat your fill of rellenos BEFORE you look over at the disgusting, oil-splatter, batter-drip-covered nightmare your kitchen has become. It will bolster your spirits for the clean up job ahead. Or, if you have kids of chore-doing age, make those little punks deal with the mess while you take a nap and really give all that cheese and batter carte blanche access to your thighs.

Nom On,

~Crunchy